ANNOUNCING: Change is part of life, and apparently, it's part of blogging, too. As of September 5, 2013, I'm merging The Virtual Goody Plate with Disco Mom Takes on the World and whatever else may henceforth spill from my fingertips (and kitchen), into one great new blog. I hope you'll join me there in exclaiming, "THIS IS AWESOMELAND."
Showing posts with label almond extract. Show all posts

Wednesday, April 10, 2013

Heaven & Hell Cake

People.  I am so far behind I feel like giving up.  The fact that today is the first 90-degree day of the year, and my air conditioning has broken, might also have something to do with it.  But I've got some cold raspberry-lime seltzer here, and the first couple of quiet hours to myself in over a month, so let's just keep on keeping on.

Heaven & Hell Cake - another one of my favs from Lit Night.  Apparently each component was a beast to master, and this cake's maker, one of Dessert Club's most skilled artisans, had to try several times to get it right.  So if you want to make it, good luck.

Heaven & Hell Cake (print recipe)
Serves 10 to 12

For the ganache:
2 lbs. milk chocolate, such as Valrhona, chopped
1 1/2 cups heavy cream

For the angel food cake:
1 1/2 cups confectioners' sugar
1 cup cake flour
1 1/2 cups egg whites
1 tsp. cream of tartar
1/8 tsp. kosher salt
1 cup sugar
2 tsp. vanilla
1 tsp. almond extract

For the devil's food cake:
1/2 cup vegetable shortening, plus more for pan
1 1/2 cups cake flour, plus more for pan
1 tsp. baking soda
3/4 tsp. kosher salt
1/4 tsp. baking powder
1 cup coffee
1/2 cup cocoa powder, sifted
1 1/2 cups sugar
1 tsp. vanilla
2 eggs

For the peanut butter mousse:
1 1/2 lbs. cream cheese, at room temperature
4 cups smooth peanut butter, at room temperature
3 1/2 cups confectioners' sugar, sifted
1 1/2 cups heavy cream

1. Make the ganache: Place the chocolate in a medium-size bowl. Bring cream to a boil in a 2-qt. saucepan; pour cream over the chocolate and let sit to melt for 5 minutes. Using a rubber spatula, combine the chocolate and cream. Cover with plastic wrap and set aside to let rest for 4 hours.

2. Make the angel food cake: Heat oven to 325°. Line bottom of a 10" round cake pan with ungreased parchment paper. In a medium bowl, sift together confectioners' sugar and flour; set flour mixture aside. In a large bowl, beat egg whites, cream of tartar, and salt with a handheld mixer on low speed until frothy. Increase mixer speed to medium, sprinkle in sugar, vanilla, and almond extract, and beat until stiff peaks form. Sprinkle half of the confectioners' sugar–flour mixture over egg whites; using a rubber spatula, fold until just combined. Repeat with remaining flour mixture. Pour batter into prepared cake pan and bake until top of cake springs back when touched, 45–50 minutes. Transfer cake to a rack and let cool.

3. Make the devil's food cake: Heat oven to 350°. Grease a 10" round cake pan with shortening and dust with flour to coat; shake out excess flour and set pan aside. In a medium bowl, whisk together cake flour, baking soda, salt, and baking powder; set flour mixture aside. In another medium bowl, whisk the coffee and cocoa powder until smooth; set coffee mixture aside. In a large bowl, beat the shortening, sugar, vanilla, and eggs with a handheld mixer on medium speed until pale and fluffy, 2 minutes. Alternately add the flour mixture and the coffee mixture to the bowl in 3 stages, beating to combine after each addition. Pour the batter into the prepared cake pan and bake until a toothpick inserted into cake comes out clean, 30–35 minutes; transfer to a rack and let cool completely.

4. Make the peanut butter mousse: In a large bowl, beat cream cheese, peanut butter, and confectioners' sugar with a handheld mixer on medium speed until smooth and fluffy, about 3 minutes. Put cream into a large bowl and beat on high speed until stiff peaks form. Using a rubber spatula, fold the whipped cream into the peanut butter mixture; set mousse aside in the refrigerator.

5. Assemble the cake: Using a serrated-blade knife, slice each cake horizontally into 2 layers. Place 1 layer of the devil's food cake on a cake stand and spread 1/3 of the peanut butter mousse over the top with a butter knife. Top mousse with a layer of the angel food cake and spread with half of the remaining mousse. Repeat with the remaining devil's food cake, mousse, and angel food cake. Wrap cake in plastic wrap and freeze for 2 hours. Stir ganache until smooth and spread evenly over the top and sides of the cake with a butter knife. Refrigerate the cake for 2 hours before slicing.

Recipe from Saveur.com and DC member J.B.

Monday, February 11, 2013

Blueberry Orange and Almond Pancakes with Orange Maple Glaze

 Hello there and welcome to pancake week.  Let's start off with a twist on a classic: who doesn't love blueberry pancakes (besides my 6-year-old)?  Orange zest, orange juice, orange-maple glaze, and a smidge of almond take these just a teensy bit over the top.  All in a good way.
 Blueberry Orange and Almond Pancakes (print recipe)
Makes 12 to 16 small pancakes

1 cup all-purpose flour
1 T granulated sugar
1 tsp baking powder
1/2 tsp baking soda
1/2 tsp salt
1 large egg
3/4 cup buttermilk
1/4 cup fresh orange juice
2 tsp orange zest
Scant 1/4 tsp almond extract
1/2 to 3/4 cup fresh blueberries
3 to 4 T butter, for griddle

1.  Place rack in the upper third of oven and preheat oven to 200 degrees.  The oven will keep the pancakes warm as you cook them in batches.

2.  In a medium bowl, whisk together flour, sugar, baking powder, baking soda, and salt.  In a small bowl, whisk together egg, buttermilk, orange juice, zest, and almond extract.  Whisk the buttermilk mixture into the flour mixture until just combined.  Fold in the blueberries.  Let batter rest for 5 minutes while the griddle heats.

3.  Over medium heat, melt 1 T of the butter in a cast-iron skillet or griddle.  Spoon 2 T batter into the hot pan and cool until golden brown on both sides, about 2 minutes per side.  Place pancakes on ovenproof plate and store in the oven to keep warm while you cook the rest of the batter, adding butter to the pan as needed.

Orange Maple Glaze

1 1/2 cups powdered sugar
3 T fresh orange juice
1 T pure maple syrup

Whisk together powdered sugar, orange juice, and maple syrup.  Serve alongside warm pancakes. 
Recipe from Joy the Baker by Joy Wilson

Sunday, November 18, 2012

Salted Almond Praline Tart

 Here's the creation that WON "Pies & Tarts" night at Dessert Club, which is no small feat.  But it was pretty awesome.  I think the Salted Almond Praline, that went on as a garnish, and was both addictive and super easy to make, was the kicker that pushed it over the edge.  Stunning with creamy almond-scented filling, fresh raspberries, and spicy-salty crust and praline, I humbly admit it did stand out. 

Better Homes and Gardens teamed up with the Almond Board of California for a "Crowd-Pleasing Almond Dishes" contest, and you guessed it, this was one of the winners.  So now it's a two-time award winner.  So you should make it this week.  And maybe every week after.  Definitely for your next recipe contest.  Yum.
  
Salted Almond Praline Tart (print recipe)
Makes 12 servings

Almond Crust:
2 1/2 cups broken cinnamon graham crackers (or cinnamon Teddy Grahams)
1 cup toasted sliced almonds
1/3 cup sugar
1/3 cup softened butter

Almond Tart Filling:
12 oz. cream cheese, softened
4 1/2 oz. white baking chocolate, chopped
1/3 cup sugar
1/2 cup light sour cream
1/4 tsp almond extract
1 egg and 1 egg yolk

Salted Almond Praline:
1 cup sliced almonds
1/2 cup sugar
2 T melted butter
1 T water
1 tsp ground cinnamon
1/2 tsp sea salt

Garnish:
Whipped cream
Fresh raspberries

1.  Preheat oven to 325F.  Prepare crust:  In food processor, combine grahams, almonds, and sugar.  Cover; process until finely ground.  Add butter.  Pulse to combine.  Press into bottom and sides of 10-inch fluted tart pan with removable bottom.  Chill 15 minutes.  Place on foil-lined baking sheet.  Bake 20 minutes or until lightly browned; cool.

2.  Prepare filling: In saucepan combine 8 oz. cream cheese and white chocolate.  Stir over low heat until melted.  In bowl beat remaining cream cheese on medium to high for 30 seconds.  Beat in sugar until smooth.  Beat in melted mixture until combined.  Beat in sour cream and extract until combined.  Beat in egg and yolk until combined Pour into crust.

3.  Bake in 325F oven 35 minutes or until center is nearly set when gently shaken.  Cool on rack 30 minutes. Loosen crust from side of pan, but do not remove.  Chill at least 2 hours. 

4.  Make Salted Almond Praline: Heat oven to 325F.  Line a baking pan with foil and spray with nonstick cooking spray.  In bowl combine 1 cup sliced almonds, the sugar, melted butter, water, cinnamon and salt.  Spread evenly in pan.  Bake 20 minutes or until golden brown.  Cool completely on rack.  Break into pieces.

5.  Remove tart from pan.  Top with whipped cream, Salted Almond Praline, and raspberries.  Serve.
Recipe from Better Homes and Gardens, July 2012

Thursday, November 15, 2012

Crustless Cranberry Pie (a.k.a. "Cranberry Awesomeness")

I'm deeply sorry I don't have a "slice" picture for this pie.  It came a little later than the others, and I forgot to "slice-and-shoot" before we gobbled it all up.  But this was one of my favorites of the night.  I asked her, "What's this called, Cranberry Awesomeness?"  She said she liked that and wouldn't tell me the real name.

Which led to a DC discussion of how I say "awesome" way too much, and even my iPhone signature says, "Sent from Awesomeland."  While it is anything but true, it conveys what I want it to.  Then someone said that she recently said, "awesome" in a conversation and got called out on it, and told "awesome" is dated and not on conversational trend anymore.  To which I reply, whatevs.  It's a classic that has not gone the way of rad or gnarly, but risen in the colloquial ranks to rub shoulders with the likes of cool.  To which my brother, who lived in England for three years, said, when a Brit wants to sound American, they always say, "Awesome!"  Which proves my point.  I think.

Regardless, I mean to bestow my highest praises on this cake-ish pie when I call it awesome.  Awesomeness.  I envision having it for a light breakfast Thanksgiving morning, snacking on it with a bit of milk or herbal tea while the heavy cooking gets underway.  Or as a dessert the same day, with a dab of cream, letting the tart berries burst on your palate surrounded by sweet almond-scented crumbs.  I've just done such a good job describing it, I might have to go make me some right now.

Crustless Cranberry Pie (a.k.a. "Cranberry Awesomeness") (print recipe)
1 cup all-purpose flour
1 cup white sugar
1/4 tsp salt
2 cups cranberries
1/2 cup chopped walnuts
1/2 cup butter, melted
2 eggs
1 tsp almond extract

1.  Preheat oven to 350 degrees F (175 degrees C). Grease one 9 inch pie pan.

2.  Combine the flour, sugar, and salt. Stir in the cranberries and the walnuts, and toss to coat. Stir in the butter, beaten eggs, and almond extract. If you are using frozen cranberries, the mixture will be very thick. Spread the batter into the prepared pan.

3.  Bake at 350 degrees F (175 degrees C) for 40 minutes, or until a wooden pick inserted near the center comes out clean. Serve warm with whipped cream or ice cream.

Recipe from Allrecipes.com

1 year ago:  Banana Chocolate Chip Muffins
2 years ago:  Mini Frittatas
3 years ago:  500 Kinds of Popcorn

Thursday, May 10, 2012

OREO's Birthday Cake


Finally, finally, here is the star of Dessert Club: Cakes!  This beaut won first place for PRETTY and second place for YUMMY, with a very discerning crowd, so you know it's amazing.  And I happen to know its maker worked long and hard to perfect it.

She was inspired by the birthday-cake-flavored Oreos that have been about, probably limited edition, to celebrate the classic cookie's 100th birthday.  I have always liked Oreos, but also took them for granted until I served a mission in Toronto, Canada, for eighteen months.  Turns out Canada's Oreos are different from America's - why did no one tell me?! - and I had to write home begging for regular installments of the "authentic" treat. 

And finally, just a trivia tidbit.  I've typed "oreo" so many times putting this post together, I had to wonder where the name came from.  Five seconds of research just taught me there is no definitive word on the matter, but the most popular theory is that the name is a combination of taking the "re" from "cream" and placing it between the two "o"s in "chocolate" - making "o-re-o."  Good enough for me.  
OREO’s Birthday Cake (print recipe)
Chocolate Oreo cake with Cake Batter Cream Cheese Frosting
In honor of, and inspired by, Oreo’s one hundredth birthday!


Birthday Cake Oreos - 1 package Oreos (21 cookies)
1.  Chop 12 Oreos (a little more than 1/2 of them), and toss with 2 Tbsps flour and set aside for the chocolate cake.
2.  Separate cookies from filling for remaining Oreos (9 cookies), reserve filling for frosting and cookies for decoration.

Chocolate Oreo Cake

Butter, for greasing the pans
1 3/4 cups flour, plus more for pans
2 cups sugar
3/4 cups cocoa powder
2 tsp baking soda
1 tsp baking powder
1 tsp kosher salt
1 cup buttermilk, shaken
1/2 cup vegetable oil
2 eggs, at room temperature
1 tsp vanilla
1 cup freshly brewed hot coffee (I used an “Americano” from an espresso machine)
1/2 package Oreos, prepared as above

1.  Preheat the oven to 350. Butter two 8-inch round cake pans. Line with parchment paper, then butter and flour the pans.

2.  Sift the flour, sugar, cocoa, baking soda, baking powder and salt into the bowl of an electric mixer fitted with a paddle attachment and mix on low speed until combined. In another bowl, combine the buttermilk, oil, eggs and vanilla.

3.  With the mixer on low speed, slowly add the wet ingredients to the dry. With mixer still on low, add the coffee and stir just to combine, scraping the bottom of the bowl with a rubber spatula.
Stir in the Oreo chunks.

4.  Pour the batter into the prepared pans and bake for 35 to 40 minutes, until a cake tester comes out clean. Cool in the pans for 30 minutes, then turn them out onto a cooling rack and cool completely.

Cake Batter Cream Cheese Buttercream Frosting
2 stick salted butter, softened
8 oz cream cheese, room temperature
1 teaspoon vanilla
1/4 teaspoon almond extract
5 cups powdered sugar
1 cup yellow cake mix (DRY MIX–NOT BATTER)
Filling only (not cookie part) from Oreos reserved for frosting, 9 cookies

1.  In the bowl of a mixer, beat butter, cream cheese, Oreo filling and extracts on medium speed until smooth. Add powdered sugar and cake mix and beat on low until just combined. Increase speed to medium and beat until fully combined.

2.  If frosting is too thick, mix in a bit of heavy cream or milk until desired consistency is reached.

Cake from Ina Garten adapted by Bean Town Baker
Frosting inspired by angieriver.com and confessionsofacookbookqueen.com but created by Dessert Club member S.W.

Wednesday, March 28, 2012

Leprechaun Muffins

 Well I didn't quite get these up for St. Patrick's, did I?  But anyone who loves pistachios as much as I do won't mind because these are great any day of the year.  A delicious sour cream batter surrounding a rich sweet pistachio filling that, in every muffin, turns out like a little smile. 

I had to hunt this recipe down like a bloodhound.  See, when I made my Frozen Pistachio Tarts, I had to buy a 3-pack of pistachio paste.  Which means I had a whole lot of pistachio paste left over.  So naturally I started looking for recipes.  In the KAF forums I saw mention of a Leprechaun Muffin, which was achingly intriguing, but I couldn't find the recipe anywhere.  I finally figured out it was published in their own publication, The Baking Sheet, but not available online.  So I went and ordered myself a back issue and waited with great anticipation.

What a gem, too.  Not only did it have this recipe, but also a Pistachio-Chocolate Chip Pound Cake (using more pistachio paste, woo-hoo!), a Daffodil Cake (a yellow-and-white sponge cake flavored with orange), Tourtiere (French meat pie), Hot Cross Buns, and more.  It's a little expensive, but I'm seriously considering a subscription.

In the meantime, here's a freebie for you, for no pistachio lover should be without Leprechaun Muffins.

Leprechaun Muffins (print recipe)
Makes 16 muffins

Batter:

1/2 cup unsalted butter, at room temperature
1 cup granulated sugar
2 large eggs
2 cups all-purpose flour
1 tsp baking powder
1 tsp baking soda
1/2 tsp salt
1 cup sour cream
1 tsp vanilla extract
1/2 tsp almond extract

Filling (makes enough for two batches of batter):
1/2 cup pistachio paste
3 ounces cream cheese
1/2 cup granulated sugar
1/4 cup all-purpose flour
1 large egg
1/2 tsp almond extract
1 drop green food coloring

Streusel:
1/4 cup butter, melted
2/3 cup confectioners' sugar
1 cup all-purpose flour
1/8 tsp salt
1/2 tsp vanilla extract
1/2 cup chopped pistachio nuts, optional

1.  Preheat the oven to 350 degrees.  Line a 12-cup muffin tin with papers and spray the insides of the papers.  Put the extras in another tin or the same one after it cooks.

2.  To make the dough:  In a large bowl, cream together the butter and sugar until fluffy.  Add the eggs, one at a time, beating between additions and stopping to scrape the sides and bottom of the bowl after each egg.  Whisk together the flour, baking powder, baking soda and salt.  Add to the egg mixture in thirds, alternating with the sour cream.  Beat in the extracts.

3.  To make the filling: Combine the pistachio paste, cream cheese, and sugar until smooth.  Add the flour, mix to combine, then beat in the egg, almond extract, and a drop of green food coloring, if using.

4.  To make the streusel: Combine the ingredients, mixing well with a fork or your hands.

5.  To assemble muffins: Scoop 2 T of batter into each of the wells of the muffin tins.  Spoon a Tablespoon of filling on top of the batter, then scoop another 2 T of batter on top.  The wells should be filled to just below the tops of the papers.  Sprinkle the streusel on top, and bake for 20 to 25 minutes, until a tester inserted in the center comes out clean.  Remove from the oven, and cool on a rack for 5 minutes before taking the muffins out of the pans to finish cooling completely.
 Coffeecake variation: Butter and flour two 8-inch round pans or a 9x13 pan.  Spread half the batter in the prepared pans; spread the filling over it, and then spoon the remaining batter on top.  Sprinkle with the streusel, then bake for 25 to 30 minutes. Remove from the oven and let cool on a rack, or cool for 10 minutes before serving.

Recipe from The Baking Sheet, Spring 2010

Tuesday, December 13, 2011

Cherry Tart Cookies

 I say this every year, but I LOVE getting the December issue of Cook's Country because it always has the winners of their Christmas cookie contest.  Which means new, and usually quite unique, fare for my holiday baking.  This year was no exception.  The $1,000 Grand Prize went to the maker of these adorable, delicious, nice-and-big filled cookies.  The crust is a soft almond sugar cookie, the filling is cherry preserves - get the best you can find - and on top of it all is a crispy thin vanilla glaze that reminds me of Hostess pies.  But of course these are a million times better.  They were easy peasy to make, and a huge hit with Dessert Club, and, I later heard, the take-home-leftovers husband crowd as well.  Yum yum.  Yum.

Yum.
Cherry Tart Cookies (print recipe)
2 1/2 cups all-purpose flour
1/4 tsp baking soda
1/4 tsp salt
12 T unsalted butter, softened
3/4 cup granulated sugar
1/4 cup milk, divided
1 large egg plus 1 large egg white
1 tsp almond extract
3/4 cup cherry preserves
1 cup confectioners' sugar
1/2 tsp vanilla extract

1.  Adjust oven racks to upper-middle and lower-middle positions and heat oven to 350 degrees.  Line 2 baking sheets with parchment paper.  Combine flour, baking soda and salt in bowl.

2.  Using stand mixer fitted with paddle, beat butter and granulated sugar on med-high speed until pale and fluffy, about 2 minutes.  Add 2 T milk, whole egg, and almond extract and beat until incorporated.  Reduce speed to low, add flour mixture in 3 additions and mix until just combined, scraping down bowl as needed.

3.  Lightly beat egg white in bowl.  Working on lightly floured counter, divide dough in half and form each into 4-inch disk.  Roll each disk into 1/4-inch-thick circle.  Using 2 1/2-inch cookie cutter, cut out rounds, gathering and rerolling dough as necessary.  Transfer half of rounds to prepared sheets, 1 inch apart.  Place heaping teaspoon of preserves in center of each round.  Top with remaining rounds and crimp with fork.  Brush filled rounds with beaten egg white and cut 1/2-inch X into center of each.

4.  Bake until edges are lightly browned, 12 to 14 minutes, switching and rotating sheets halfway through baking.  Let cookies cool on sheets for 5 minutes and then transfer to wire rack to cool completely, about 1hour.  Whisk confectioners' sugar, remaining 2 T milk, and vanilla in bowl until smooth.  Brush cookies with glaze and let sit for 30 minutes.  Serve.  Makes about 18 large cookies.

Recipe from Sara Cowley of Winamac, IN - 2011 Cook's Country Christmas cookies contest Grand Prize Winner

Saturday, October 22, 2011

Raspberry Tea Cake with Mascarpone Cream Filling

 
 It's crazy, I am still finding fresh raspberries on sale at the store, even in October!  And they're good ones.  So as long as I am finding them, we are eating them.

It was my friend's birthday a few weeks ago, and I know she loves creamy stuff, and fruit, so I thought this would be a nice birthday cake for her.  I love this size for when you just have a small gathering, or a family, and you don't need a huge cake with leftovers for weeks.  And you know what I always say, if it's not frosted you can eat it the next day for breakfast.  Which they did!
The raspberry tea cake would also be delicious on its own, as an actual tea cake.  It's just a fabulous sour cream loaf flavored with almond extract, or you could use vanilla, with raspberries folded in.  But if you happen to have a cake leveler and know how to use it, or a VERY steady hand with a bread knife (partially freeze the loaf for less chance of it falling apart), then go for it - slice it into four horizontal layers and slather on this dreamy creamy mascarponey filling!  Either way, you will boost your popularity.  And maybe even mine.

Raspberry Tea Cake with Mascarpone Cream Filling (print recipe)

Cake
2 cups King Arthur Unbleached All-Purpose Flour
2 teaspoons baking powder
1/2 teaspoon baking soda
1/2 teaspoon salt
1/2 cup butter, softened
1 cup granulated sugar
2 large eggs
1 teaspoon almond extract
3/4 cup sour cream
1 cup fresh raspberries


Cream Filling
1 1/2 cups whipping cream
2/3 cup granulated sugar
8 ounces mascarpone cheese
1/2 teaspoon vanilla
confectioners' sugar for garnish

1.  Preheat oven to 350°F. Grease a 9 x 5-inch loaf pan. In a large bowl, combine flour, baking powder, baking soda and salt; mix well and set aside. Using an electric mixer, cream the butter and sugar until light and fluffy. Beat in the eggs and the almond extract. Slowly add the dry ingredients, alternating with the sour cream. Beat until well moistened, then very carefully fold in the raspberries. Bake for 50 to 60 minutes or until a tester comes out clean. Let sit for 10 minutes on a rack to cool, then remove the pan and cool completely.

2.  The Cream Filling: Beat the whipping cream and 1/3 cup sugar until stiff peaks form. In a separate bowl, cream the mascarpone cheese and remaining 1/3 cup sugar, vanilla and Chambord until creamy. Add the cheese mixture to the whipped cream mixture.

3.  Trim the brown edges off the top and sides of the cake. With a serrated knife, slice the loaf lengthwise into 3 to 4 thin layers. Place one layer on a serving plate, top with some cheese filling, then another layer of cake and more filling, then repeat the next two layers, leaving a cake layer on top. Sift confectioners' sugar over the top layer. Cover and refrigerate. (*I placed the loaf pan back over it while in the fridge to help it from sliding or losing shape.

Recipe from King Arthur Flour


Friday, October 7, 2011

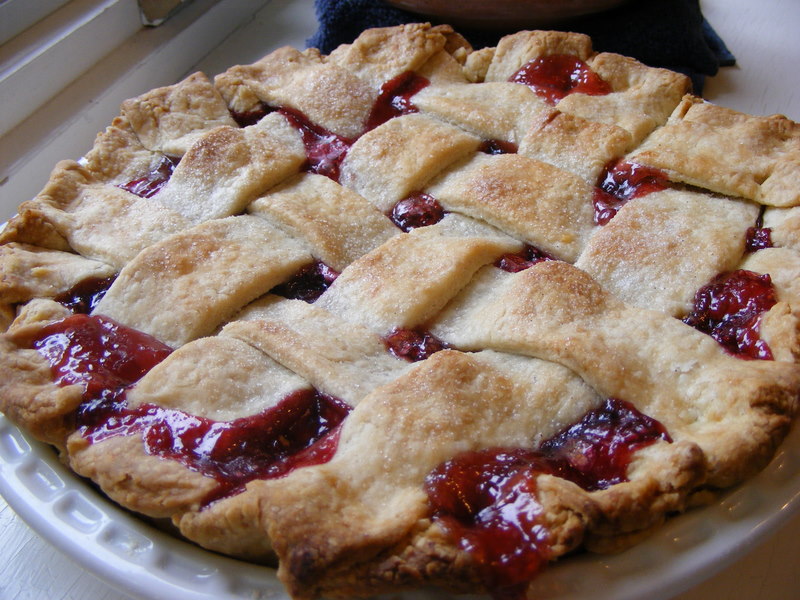
Lattice-Top Cherry Pie

I am a bit behind posting this one.  I made it this summer, after we went sour cherry picking.  Because believe me, and this is a lesson you only need learn once, sweet cherries like Bing and Ranier are no good in pies - they lose color, flavor and structure and all you end up with is a bland pie in a good crust you spent a lot of time on.

But if you want to make this delectably delicious cherry pie out of cherry season, like say for Thanksgiving, you still have options: jarred Morello cherries (I know Trader Joe's carries them, not sure where else) OR Oregon Fruit canned tart cherries.  Cook's Illustrated says both are great in this pie.

And.  How have we gone two paragraphs without discussing the lattice?  Eh?  You like?  That is one trusty, crusty, pretty top, and it's easier to make than you'd think.  (See instructions below.)

I can't tell you how happy and proud I am when I have a pie success.  They are still grossly outnumbered by disasters, but bit by bit there is improvement.  I didn't even like cherry pie before I made this, any cherry pie.  Because there are so many bad ones.  But this one is a bright, sweet-tart pastry delight.  Maybe I'll just go make another.
Pie Dough for Lattice-Top Pie (print recipe)
3 cups (15 oz.) unbleached all-purpose flour
1 tsp salt
2 T sugar
7 T vegetable shortening, chilled
10 T cold unsalted butter, cut into 1/4-inch pieces
10 T ice water

1.  Process the flour, salt and sugar in a food processor until combined.  Add the shortening and preocess untiil the mixture has the texture of coarse sand, about 10 seconds.  Scatter butter pieces over the flour mixture; cut the butter into the flour until the mixture is a pale yellow and resembles coarse crumbs, with butter bits no larger than small peas, about ten 1-second pulses.  Turn the mixture into a medium bowl. 

2.  Sprinkle 8-9 T ice water over the mixture.  With a rubber spatula, use a folding motion to mix.  Press down on the dough with the broad side of the spatula until the dough sticks together, adding up to 2 T more ice water if the dough will not come together.  Divide the dough into 2 pieces, one slightly larger than the other (if possible, weigh them; they should weigh 16 ounces and 14 ounces.)  Flatten the larger piece into a rough 5-inch square and the smaller piece into a 4-inch disk; wrap separately in plastic and chill 1 hour.

Lattice-Top Cherry Pie (print recipe)

1 recipe Pie Dough for Lattice-Top Pie
Flour for dusting work surface
1/4 cup (1 ounce) cornstarch
1 to 1 1/4 cups plus 1 T sugar
1/4 tsp ground cinnamon
Pinch salt
3 (24-ounce) jars Morello cherries, drained (about 6 cups), or fresh or canned sour cherries, pitted and drained
1/4 tsp almond extract

1.  Remove the dough from the refrigerator (if refrigerated longer than 1 hour, let stand at room temperature until malleable.)  Roll the larger piece of dough to a 15 by 11-inch rectangle, about 1/8 inch thick; transfer the dough rectangle to a baking sheet lined with parchment paper.  With a pizza wheel, fluted pastry wheel, or paring knife, trim the long sides of the rectangle to make them straight, then cut the rectangle lengthwise into 8 strips, 15 inches long by 1 1/4 inches wide.  Freeze the strips on the baking sheet until firm, about 30 minutes.   
2.  Roll the smaller piece of dough on a lightly floured work surface or between two large sheets of parchment paper or plastic wrap to a 12-inch circle.  Transfer the dough to a 9-inch pie plate by rolling the dough around a rolling pin and unrolling over the pan.  Working around the circumference of the pan, ease the dough into the pan corners by gently lifting the edge of the dough with one hand while pressing into the pan bottom with the other hand.  Leave the dough that overhangs the lip of the pie plate in place; refrigerate the dough-lined pie plate.
3.  Remove the dough strips from the freezer; if they are too stiff to be workable, let stand at room temperature until malleable and softened slightly but still very cold.  Following the illustrations below, form the lattice top and place in the freezer until firm, about 15 minutes.
To make the lattice, lay out 4 strips of dough on parchment paper.  Fold the first and third strips back, then place a long strip of dough slightly to the right of the center as shown.
Unfold the first and third strips over the perpendicular strip and fold the second and fourth strips back.  Add a second perpendicular strip.  Now unfold the second and fourth strips.
Repeat this process with 2 more perpendicular strips (you will have a total of 8 strips of dough, 4 running in each direction).  Freeze the finished lattice until very firm and then slide it over the filling.
(See step 6)  Trim off the excess lattice ends, fold the rim of the shell up over the lattice strips and crimp.
4.  Meanwhile, adjust an oven rack to the lowest position, place a rimmed baking sheet on it, and heat the oven to 500 degrees.

5.  Mix together the cornstarch, 1 to 1 1/4 cups sugar (taste fruit and adjust amount as desired), cinnamon, and salt in a medium bowl.  Stir in the cherries and almond extract.

6.  Turn the cherry mixture into the dough-lined pie plate.  Remove the lattice from the freezer and place on top of the filled pie.  Trim the lattice strips and crimp the pie edges.  Lightly brush or spray the lattice top with 1 T water and sprinkle with the remaining 1 T sugar (or vanilla sugar if you have it.)
7.  Lower the oven temperature to 425 degrees.  Place the pie on the baking sheet and bake until the crust is set and begins to brown, 25 to 30 minutes.  Rotate the pie and reduce the oven temperature to 375 degrees; continue baking until the crust is deep golden brown and the juices bubble, 25 to 30 minutes longer.  Cool the pie on a wire rack for at least 2 hours before serving.
 Recipe from Baking Illustrated: The Practical Kitchen Companion for the Home Baker

Monday, March 7, 2011

Pancake Week #7 Hazelnut Pancakes with Raspberry Coulis

Well here is Pancake Week's final, and possibly best, recipe. There are pulverized hazelnuts, lots of them. Nutmeg, one of my favorites. And I think the special secret is the browned butter, adding that rich toasty taste you can't get any other way.

As for the Raspberry Coulis (coulis just means a thick pureed sauce), I could just eat it with a spoon. I added extra sugar but just make it to your taste. It is cool and tart in contrast to the warm sweet pancakes, and together they are divine. I love the suggestion at the end to serve with chocolate and creme fraiche as well - because these pancakes, and anyone who makes them, deserve the very best. Happy Pancake Week!

Hazelnut Pancakes (print recipe)
4 T unsalted butter
1/2 cup hazelnuts, skinned*
1/3 cup sugar
1 cup all-purpose flour
1 1/4 tsp baking powder
1/8 tsp freshly grated nutmeg
Dash of salt
1 cup milk
2 large eggs
1/2 tsp vanilla extract
1/4 tsp almond extract

1. Melt butter in a small saucepan over low heat. Continue cooking, keeping a watchful eye on the pan, until the butter turns a deep, dark, nutty brown, about 5 to 8 minutes. The butter should become very brown and there will be some solid bits in the pan - that's OK - but you must not let it burn. Set the pan aside.

2. Put the hazelnuts and sugar in a food processor fitted with the metal blade and process to pulverize the nuts. Don't worry if small bits of nuts remain - it's better to have a few crunchy pieces of nut than to turn the mass into hazelnut butter, which is what you'll get if you process the mixture too long. Transfer the nuts and sugar to a medium bowl, add the flour, baking powder, nutmeg and salt, and whisk to combine.

3. In another bowl, whisk together the milk, eggs, extracts and brown butter, scraping the dark bits from the bottom of the pan into the bowl. Pour the liquid ingredients over the dry ingredients and mix with the whisk, stopping when everything is just combined. Don't worry if batter is a bit lumpy.

4. If necessary, lightly butter or spray your griddle or skillet. Preheat over medium heat or 350. If you want to hold the pancakes until serving time, preheat oven to 200.

5. Spoon 2 T batter onto griddle for each pancake, allowing ample space for spreading. When the undersides are very brown and the tops are lightly speckled with bubbles that pop and stay open, flip the pancakes over with a wide spatula and cook until the other sides are light brown. Serve immediately, or keep the finished pancakes in the preheated oven while you make the rest of the batch. Makes about 15 pancakes.

*Skinning hazelnuts: Toast them in a skillet over medium-low or on a baking sheet in a 350 oven for a few minutes, until fragrant and the skins start to crack. You will both see and hear them crackling. Then pour them onto half of a clean textured dishtowel (terry cloth or waffle weave are good.) Fold the other half of the towel over the nuts and rub them - the cracked skins will flake/rub off pretty easily.

Raspberry Coulis
1/2 pint (about 1 1/4 cups) fresh or unthawed frozen unsweetened raspberries
2 T sugar, or more to taste
1 tsp fresh lemon juice, or more to taste
2 tsp orange juice or orange liqueur

Puree the berries with the sugar and lemon juice in a blender or food processor fitted with the metal blade. Taste and add more sugar and/or lemon juice if needed. Add the orange juice. Pour into a covered container and chill until ready to serve. Can be made up to 1 day in advance.

To Serve:
Serve Hazelnut Pancakes hot off the griddle simply with a drizzle of Raspberry Coulis
- OR -
Spread each pancake with a little melted bittersweet chocolate and a spoonful of lightly sweetened Creme Fraiche. Add a drizzle of Raspberry Coulis and a shower of finely chopped toasted hazelnuts.

Recipe from Pancakes: from Morning to Midnight by Dorie Greenspan

Thursday, February 17, 2011

Italian Cream Wedding Cake

There is nothing more thrilling for an amateur baker than to have something turn out looking exactly like it does in the book, AND tasting as good as it looks! If you think about it for a second, you realize the credit probably goes to the recipe's author rather than the home cook, but I am taking it anyway. I am AMAZING!

Because this cake is. This is what we served for the grown-up February birthdays at our house (me, my husband, my Mom.) Four layers of delicious yellow cake full of coconut, pecans, and FOUR different extracts, filled with creamy vanilla pastry cream* and slathered with lemony cream cheese frosting. We served it, as directed, with lemon sorbet, but ooheee, that sorbet was tart with this cake! I think I'd go with sherbet at least, or even better, lemon ice cream. Yes, I think lemon ice cream would be perfect.

*Here's the thing about pastry cream. It's kind of hard to make and easy to screw up. And it makes a mess. And at least the times I've successfully made it without a curdled disaster, it never tasted as good as vanilla cook-and-serve pudding. So after another attempt at pastry cream this time around, I ditched the effort and went with the pudding. So delicious.
Italian Cream Wedding Cake (print recipe)
Cream Filling:

1 large box of cooked vanilla pudding, prepared and chilled

Cake Batter:
1/2 cup unsalted butter, softened
1/2 cup shortening
1 1/2 cups sugar, divided
5 large eggs, separated
2 tsp vanilla extract
1/4 tsp almond extract
1/2 tsp lemon extract
1/2 tsp orange extract
3/4 cup buttermilk
2 cups all-purpose flour
2 tsp baking powder
1/4 tsp baking soda
1/8 tsp salt
1/2 cup toasted shredded coconut
1/2 cup toasted pecans, finely chopped

Butter-Cream Cheese Frosting:
1/4 cup unsalted butter, softened
3/4 cup cream cheese, softened
2 cups confectioners' sugar
1 1/2 tsp vanilla extract
1 tsp fresh lemon juice
Milk, as necessary

Finishing Touches:
Chopped toasted pecans
Toasted shredded coconut
White chocolate shavings/curls, optional1. Prepare pudding according to box directions, maybe add a little less milk so it will set up firm. Chill well, several hours or up to 3 days.

2. For cake, preheat oven to 350. Spray two 9-inch round pans with cooking spray. Line bottoms with parchment paper circles and spray them with cooking spray. Place pans on parchment paper lined baking sheets and wrap with bake-even strips if you have them.

3. In a mixer bowl, cream butter and shortening until well blended and fluffy. Add 1 1/4 cups sugar and mix well. Blend egg yolks into butter mixture, scraping down bowl every so often (if it seems curdled, add some of the flour called for in cake batter. Fold in vanilla, almond, lemon and orange extracts. Blend in buttermilk and then fold in remaining flour, baking powder, baking soda and salt. Lastly, add coconut and pecans.

4. Place egg whites in a clean, dry mixer bowl, and using whisk attachment, whip egg whites on low speed of mixer until frothy. Increase speed and slowly dust in remaining 1/4 cup sugar. Increase speed and whip until whites are stiff and glossy, abut 3 to 4 minutes. Fold one-third of egg whites into cake batter. Then carefully fold in remaining whites so as to incorporate whites but not deflate batter.

5. Spoon batter into prepared pans. Bake until cakes spring back when gently pressed with fingertips, 25 to 30 minutes. Cool cake layers well, and, once cooled, cover loosely with wax paper while making frosting.

6. For frosting, cream butter and cream cheese in a mixer with paddle attachment until smooth. Add confectioners' sugar, vanilla, lemon juice, and as much milk as required to get a smooth and spreadable consistency. Whip on medium speed for 3 minutes.

7. To assemble, cut each cake in half horizontally. Whisk or mix chilled pudding with a spoon to loosen it. Place one cake layer on a serving platter and cover with one-third pudding. Sandwich remaining layers the same way, leaving top layer plain.

8. Frost cake sides and then top with Butter-Cream Cheese Frosting. Dust top with a fine mixture of pecans, coconut and white chocolate shavings or curls. Chill 1 hour before serving (or up to 3 days.)

Recipe adapted from A Passion for Baking by Marcy Goldman

Wednesday, December 29, 2010

Apricot Almond Cookies

These cookies are so fabulous - sweet, chewy, chunky, but not too many flavors. They have become one of my friend Shanna's regulars, and you know it takes a lot to become a regular, in anyone's kitchen, and especially Shanna's. When you need something that's not too heavy, not too rich, but still sweet and satisfying, this is it!
Apricot-Nut Cookies with Almond Icing
Cookies:

1/2 cup (1 stick) unsalted butter, at room temperature
1/2 cup plus 2 tablespoons sugar
1 teaspoon pure vanilla extract
1/4 teaspoon ground cinnamon
1/4 teaspoon fine sea salt
1 large egg
1 1/4 cups all-purpose flour
1/2 cup dried apricots, coarsely chopped
1/4 cup slivered almonds, toasted
2 tablespoons pine nuts, toasted
-OR- for chunkier cookies, use chopped almonds instead of sliced and pine nuts

Icing:
1 3/4 cups confectioners' sugar
5 to 7 tablespoons almond flavored liqueur OR a little water and almond extract, to achieve spreading consistency

1. For the Cookies: In a large bowl, beat the butter, sugar, vanilla, cinnamon, and salt with an electric mixer until light and fluffy, about 2 minutes. Beat in the egg. Stir in the flour until just blended. Mix in the apricots, almonds, and pine nuts.

2. Transfer the dough to a sheet of plastic wrap and shape into a log, about 12-inches long and 1 1/2-inches in diameter. Wrap the dough in the plastic and refrigerate for 2 hours.

3. Preheat the oven to 350 degrees F. Line 2 heavy baking sheets with parchment paper.

4. Cut the dough log crosswise into 1/4 to 1/2 inch-thick slices. Transfer the cookies to the prepared baking sheets, spacing evenly apart. Bake until the cookies are golden around the edges, about 15 minutes*. Transfer the cookies to a wire rack to cool completely before icing.*The longer they cook, the crunchier they will be. Slightly undercook for a soft, chewy cookie.

5. For the Icing: Place the confectioners' sugar in a medium mixing bowl. Gradually whisk in the almond flavor (and water, if using) until the mixture is of drizzling consistency.

6. Place the wire rack over a baking sheet. Using a spoon or fork, drizzle the cookies with the icing, allowing any excess icing to drip onto the baking sheet. Allow the icing to set before serving, about 30 minutes.

Recipe adapted from Giada De Laurentiis, 2008

Cookies made by Shanna S.
Click here for printable recipe

Wednesday, December 22, 2010

Orange Almond Bars

So these are what my Mom made for Dessert Club, and they were among my favorites. They're similar to biscotti - handy dunkable shape, refreshing almond flavor, great with any beverage - except there's no second bake so instead of crunchy they are gorgeously soft and chewy. I could easily eat a whole plateful with a mug of cocoa and a good book (currently reading Catching Fire, the middle book in the Hunger Games trilogy - totally engrossing - I digress.)

And that orange glaze! It figuratively and literally tops the cookie. I love easy things that are awesome!

Orange Almond Bars
Cookie:

1/2 cup butter, softened
1 1/2 cups all-purpose flour
1 cup sugar
1 egg
2 tsp baking powder
1 T finely grated orange peel
1/2 tsp almond extract
1/4 tsp salt
Milk for brushing
1/2 cup sliced almonds

Orange Glaze:
1/2 cup powdered sugar
1/4 tsp almond extract
1/2 tsp orange extract
1 T orange juice

1. Preheat oven to 325. Prepare two baking sheets by lining them with parchment paper.

2. In mixer bowl, beat butter until light, about a minute. Ad din half the flour, all the sugar, egg, baking powder, orange peel, almond extract and salt. Beat until combined, then add in the rest of the flour.

3. With your hands, form into a ball and move over to a floured board. Divide dough into four balls. make each into a roll about 8 inches long, then flatten it with a rolling pin to about 2 inches wide. Put them 4 inches apart onto the two prepared cookie sheets. Brush with milk and sprinkle with almonds.

4. Bake for about 22 minutes or until light brown. While still warm and on the sheets, cut diagonally into slices about 1 inch wide. Transfer to wire cooking racks with something underneath to catch the drips. When cool, drizzle with the orange glaze.

Recipe adapted from 100 Best Cookies magazine, 2009

Cookies made by Dessert Club member Carol Y. (Mom)

Click here for printable recipe

Friday, December 3, 2010

Chewy Cherry-Almond Bars

If it's been awhile since you had a cherry-almond combination, it's time to make these. I was re-amazed at the fabulous flavors - rich, fruity, truly delicious. The main ingredients - almonds, oats and cherry preserves - are perfectly balanced and showcased and I had a hard time limiting myself to only one or two at a time.

Also. I took these to a neighborhood gathering and two people asked me for the recipe. So it's not just me.

Chewy Cherry-Almond Bars
1 cup butter, softened
2 cups packed brown sugar
2 tsp baking powder
1 egg
1 tsp almond extract
2 cups all-purpose flour
2 cups regular rolled oats
1/2 cup sliced almonds
1 12-ounce jar cherry preserves

1. Preheat oven to 350. Line a 9x13 baking pan with foil, extending foil over edges of pan. Grease foil; set pan aside.

2. In a large bowl beat butter with an electric mixer on medium to high for 30 seconds. Add brown sugar and baking powder. Beat until combined, scraping sides of bowl occasionally. Beat in egg and almond extract until combined. Beat in as much of the flour as you can with the mixer. Using a wooden spoon, stir in any remaining flour, the oats, and almonds.

3. Remove 1/2 cup of the dough and set aside. Press the remaining dough evenly into prepared baking pan. Spread with preserves. Crumble the reserved 1/2 cup dough evenly over preserves layer.

4. Bake, uncovered, about 35 to 40 minutes or until lightly browned. Cool in pan on a wire rack. Using edges of foil, lift uncut bars out of pan. Cut into bars. Makes 36 bars

Wednesday, September 22, 2010

Toasted Coconut Cupcakes


Cupcakes are just awesome. They are portable, pretty and perfectly portioned. And most importantly, they are always topped with frosting.

Take these, for example. I made them for the teachers at Hazel's school when the PTA provided dinner the night of parent/teacher conferences. Because if anyone deserves a fabulous cupcake with, oh, I'll just go ahead and tell you, 23 grams of fat, it is elementary school teachers. Butter. All the way.

Toasted Coconut Cupcakes
2 3/4 cups butter, at room temperature, divided
2 cups granulated sugar
4 large eggs
2 teaspoons each vanilla and almond extracts, divided
3 cups all-purpose flour
1/2 teaspoon each baking powder, baking soda, and salt
1 cup coconut milk
1 1/2 cups flaked coconut, plain or toasted (I toasted mine for a few minutes in the oven as it heated), divided
8 ounces cream cheese, at room temperature
2 3/4 cups powdered sugar

1. Preheat oven to 350°. In a large bowl, cream together 2 cups butter and granulated sugar until light and fluffy. Add eggs, one at a time, beating well after each addition. Mix in 1 1/2 teaspoons each vanilla and almond extracts.

2. In another large bowl, combine flour, baking powder, baking soda, and salt. Add to butter and sugar mixture in 3 batches, alternating with coconut milk. Stir 1 cup flaked coconut into the batter.

3. Fill 30 paper-lined muffin cups (1/2-cup capacity) in two or more muffin pans about 2/3 full with batter. Bake until a toothpick inserted into the center of a cupcake comes out clean, about 17 minutes. Cool for 10 minutes before removing muffins from pans. Cool completely.

4. Meanwhile, in a medium bowl, beat cream cheese, 3/4 cup butter, and 1/2 teaspoon each vanilla and almond extract until smooth. Gradually beat in powdered sugar. Frost cupcakes and sprinkle with remaining coconut. Makes 30 cupcakes (enough to fit in my cupcake caddy for the teachers plus 6 left over for my family.)

Recipe adapted from Sunset, June 2006

Sunday, December 27, 2009

Chocolate Almond-Apricot Cookies

I'm not gonna lie to you. We're back to cookies with more than a few steps. But these ones are gorgeous, interesting, delicious, and plenty chocolately for your trouble. And while they do have several steps and take a long time start-to-finish, they're not terribly complicated. Meaning, if you just follow the directions, they'll turn out great. Nothing too tricky. Besides, aren't you just a tiny bit curious what chocolate, almond, apricot and cardamom will do together to your tastebuds? It's worth finding out.

Chocolate Almond-Apricot Cookies
Makes about 6 dozen cookies
1 cup butter, softened
1 cup granulated sugar
1/2 cup packed brown sugar
1/2 tsp baking powder
1/2 tsp salt
1/4 tsp ground cardamom
2 eggs
1 tsp vanilla
3 cups all-purpose flour
1 cup coarsely grated semisweet chocolate (5 ounces - wow, prepare to get messy grating it!)
1/2 cup finely snipped dried apricots
1/3 cup almonds, ground (I used almond meal from Trader Joe's)
1 1/2 cups semisweet chocolate pieces (9 ounces)
1 T butter
1/4 tsp almond extract

1. In a large mixing bowl, beat the 1 cup butter with an electric mixer on medium to high speed for 30 seconds. Add granulated sugar, brown sugar, baking powder, salt, and cardamom. Beat until combined, scraping sides of bowl occasionally. Beat in eggs and vanilla until combined. Beat in as much of the flour as you can with the mixer. Stir in any remaining flour, the grated chocolate, the apricots and almonds. Divide dough in half. If necessary, cover and chill dough about 30 minutes or until easy to handle.

2. Meanwhile, for filling, in a small saucepan heat and stir the 1 1/2 cups chocolate pieces and the1 T butter over low heat until smooth. Stir in almond extract. Set aside.

3. On a lightly floured surface, roll half of the dough into a 10-inch square. *Seriously, measure it and don't make it much bigger or else you will not have enough filling to cover the area. Spread half of the filling over square, leaving a 1/2-inch border around edges. (If filling becomes too thick to spread, add hot water, 1 tsp at a time, until filling is spreadable.) Roll up square. (If dough cracks, slightly, allow it to stand at room temperature for a few minutes.) Pinch to seal. Wrap roll in plastic wrap or waxed paper. Repeat with remaining dough and filling. Chill about 4 hours or until firm. *To keep rolled dough from flattening on one side in the fridge, place in a glass, or in this case 2 glasses, on their sides:
4. Preheat oven to 375. Using a sharp knife, cut rolls into 1/4-inch slices. Place slices 2 inches apart on an ungreased cookie sheet. Bake for 8 to 10 minutes or until edges are light brown. Let stand for 1 minute on cookie sheet. Transfer to a wire rack and let cool.
Recipe from Better Homes and Gardnes The Ultimate Cookie Book

Wednesday, September 2, 2009

JoAnn's Big "Eat 'Em Today" Cinnamon Rolls

Happy September! In honor of Back to School Month I am moving these BEST CINNAMON ROLLS on EARTH to the front of the queue - they are the PERFECT after school snack.Ever since starting this blog I have been on the hunt for a truly divine cinnamon roll recipe. I've tried three or four over the months but none were quite what I was looking for. I wanted something soft, yeasty, stretchy and perfectly sweet and spicy. I don't know why I was looking so hard, when I had JoAnn Randall's recipe at my fingertips all along.

JoAnn is my friend Shanna's mother. I've never actually met her - she lives in Rigby, Idaho - but I have heard endless wonderful stories about her and I have tasted many of the recipes that come from her kitchen, each better than the last. As a farmer's wife and mother of ten, JoAnn made almost everything from scratch, three times a day, seven days a week, for years and years for her family. I imagine in those circumstances it wouldn't take long to become a pretty amazing cook. At least in JoAnn's case that is definitely true.
These are called "Eat 'Em Today" Cinnamon Rolls because the fresher they are, the better. But I have frozen some, double wrapped in plastic and foil, to be microwaved later, and they still satisfy mighty well. JoAnn used to make these for things like football teams and church brunches since they make two dozen. The day I made them, I kept a pan for myself (ahem, I mean my family), brought some to my neighbor from whom I'd borrowed a beach umbrella for the Assateague Island trip, took half a dozen to my sister Maren's family, and shared some with the guys working on our basement (it was only human of me since they had to smell them cooking all morning!)

A few notes - the recipe I got was a copy of the one Shanna had, and in reading it, it was obviously written for someone who already knows the recipe. I had to call her to ask for things like length of raising times and amounts of filling ingredients since they never measure, they just know what to do. I did some estimates but there is wiggle room for what you like. Just don't wiggle too much or they won't be the BEST CINNAMON ROLLS on EARTH.
So if you've got a great cinnamon roll recipe, pass it my way, I'd love to make it and compare. But if you don't have one, look no further. You do now. You can thank JoAnn.

JoAnn's Big "Eat 'Em Today" Cinnamon Rolls

Dough:
4 cups milk, scalded
2 eggs, beaten
2 tsp salt
1/2 cup sugar
6 T butter, melted
2 T yeast
1/2 cup warm water
10 to 12 cups flour

Filling:
Soft butter
Lots of cinnamon
Lots of brown sugar
Raisins and/or nuts, optional

Frosting:
1/4 cup soft butter
4 T cream or milk
4 to 5 cups powdered sugar
1/2 to 1 tsp vanilla and/or almond extract (I did 1/2 tsp of each)

1. Dissolve yeast and a pinch of sugar in 1/2 cup warm water. Heat milk until steaming and bubbles form around edge but not boiling. Cool slightly. Add beaten eggs, salt, sugar, melted butter, and yeast/water mixture; mix well. Add flour 1 cup at a time but don't add too much - the dough should still be quite sticky.

2. Place dough in very large greased bowl, cover and raise for about 45 minutes. Punch down and raise again for about 45 minutes. (I put the dough in my biggest bowl and it was still spilling over the edges and onto the counter after the second rise. I obviously need a bigger bowl.)

3. Pour dough onto large clean floured surface. Knead a little flour into the dough to make it easy to handle. Divide dough in half and set one half aside. Roll remaining half into a large square. Top with softened butter. Sprinkle cinnamon on very generously. Then spread handfuls of brown sugar around generously. Sprinkle on lots more cinnamon. If adding nuts and raisins, press them gently into the dough. Raisins go along the top 2 inches of dough so they will be in the center of the rolls.

4. Roll the dough tightly from top towards you. Use dental floss to divide in half, half again, and then in thirds, for 12 rolls total. Place on baking sheets lined with parchment, silpat, or sprayed with cooking spray, a dozen per sheet. Repeat with other half of dough.

5. Allow rolls to rise, covered loosely with plastic wrap, for about 25 minutes. The way to tell if they are ready is: if you poke the dough and it follows your finger out, they need to rise some more. Your poke should leave a mark.

6. Heat oven to 400. Bake for 15 to 20 minutes (watch them after 15 so they don't overcook.)

7. To prepare frosting, cream butter and 1 T cream. You could add a little cream cheese if you like. Add powdered sugar and extract. Add the rest of the cream gradually until it's a spreading consistency you like. Frost rolls while still warm. Little helpers like this part.
Recipe from JoAnn Randall
Related Posts Plugin for WordPress, Blogger...