ANNOUNCING: Change is part of life, and apparently, it's part of blogging, too. As of September 5, 2013, I'm merging The Virtual Goody Plate with Disco Mom Takes on the World and whatever else may henceforth spill from my fingertips (and kitchen), into one great new blog. I hope you'll join me there in exclaiming, "THIS IS AWESOMELAND."

Friday, October 28, 2011

Pistachio-Chai Muffins


This recipe helped dispel a misconception I had about chai.  For some reason I thought it was a kind of tea, like black tea or green tea.  (I only drink herbal tea so I really didn't know.)  In much of southeast Asia "chai" is the generic word for "tea."  In those areas, a warming blend of Indian spices is added to tea to make what they call "masala chai."  Since English speakers already use the word "tea" for tea, "chai" became the word for spiced tea for us.  When I looked up what kind of spices go into chai - ginger, cinnamon, cardamom, fennel seeds, cloves, pepper - I realized that sounded JUST like my total fav herbal tea - Celestial Seasonings Bengal Spice.
So I got out the box and read the following off the side:
Brimming with cinnamon, ginger, cardamom and cloves, a cup of our aromatic Bengal Spice tea is like a trip to an exotic spice market in a faraway land. This adventurous blend is our caffeine-free interpretation of Chai, a piquant Indian brew traditionally made with black tea. Try Bengal Spice with milk and sugar for a true Chai experience.
 So there you go.  I've been drinking chai herbal tea for years and not even known it.  It's the best.  When I put it all together and realized two bags of Bengal Spice were going into these muffins PLUS there were pistachios, it was a no-brainer.  AMAZING!  And they are as good as they sound.  Or even better.
Pistachio-Chai Muffins (print recipe)
7.9 ounces all-purpose flour (about 1 3/4 cups)
1/2 cup packed brown sugar
1 tsp baking powder
1 tsp baking soda
1/4 tsp salt
2 chai blend tea bags, opened (I use Celestial Seasonings Bengal Spice herbal tea, tiger on the box)
1 cup low-fat buttermilk
1/4 cup butter, melted
1 1/2 tsp vanilla extract, divided
1 large egg, lightly beaten
Cooking spray
1/3 cup shelled dry-roasted pistachios, chopped
1/2 cup powdered sugar
1 T water

1.  Preheat oven to 375.

2.  Weight or lightly spoon flour into dry measuring cups; level with a knife.  Combine flour, brown sugar, baking powder, baking soda and salt in a large bowl, stirring with a whisk.  Cut open tea bags; add tea to flour mixture, stirring well.  Make a well in the center of the mixture.  Combine buttermilk, butter, 1 tsp vanilla, and egg in a bowl, stirring well with a whisk.  Add buttermilk mixture to flour mixture, stirring just until moist. 

3.  Place 12 muffin-cup liners in muffin cups; coat liners with cooking spray.  Divide batter evenly among prepared muffin cups.  Sprinkle nuts evenly over batter.  Bake at 375 for 15 minutes or until a wooden pick inserted in center comes out clean.  Cool for 5 minutes in pan on wire rack. 

4.  Combine remaining 1/2 tsp vanilla, powdered sugar, and 1 T water, stirring until smooth.  Drizzle evenly over muffins.  Makes 12 muffins.

Recipe from Cooking Light, May 2011

Tuesday, October 25, 2011

Halloween Candy Mini Cupcakes (a.k.a. the PERFECT Halloween treat)

I'm not even going to insult you by quipping, "Oh, these are great to make with all that leftover Halloween candy!"  Because it's pretty specific - you need mini Reese's cups and candy corns.  Candy corns, okay, you might have some of those left over.  But who has Reese's cups sitting around?  They are the first to go at my house.  (For the true Halloween leftovers, we need a recipe that uses things like Laffy Taffy, Jolly Ranchers and Sweet Tarts - anyone?)  So you have to go out and buy - or carefully save out - the candy for these.  You can do that. 

I will also not insult you by pointing out the only Halloweeny thing about these is the candy corns.  You can - and should - make these any time of year with just the Reese's, or with any relevant holiday accent atop.  Cadbury mini eggs, Christmas color M&M's, etc.  But Martha Stewart called these "Mini Triple-Treat Cupcakes" and I thought that name was dumb, so I changed it.

OK, so you've got a peanut butter batter, one delicioso Reese's mini cup which fits in there perfectly, and a candy corn on top.  Pretty much the PERFECT Halloween treat and I'll tell you why:
  1. They are bite-size, maybe 2-3 bites for smaller kids.  Imagine you're at a school or church Halloween party and the sugary spread is massive.  Do you or your kids really want an entire marshmallow-ghost cupcake when there is so much sugar to be had?  Better to go smaller.
  2. They are festive - you know, Halloween colors and all that.  Plus everyone loves a surprise filling, no one more than me.
  3. They are EASY.  We already know baking is my thing; decorating is not.  I want my food to look nice and appetizing without hours of multi-color piping if I can avoid it.  Plopping a candy corn on top is my kind of decorating.
  4. They are peanut butter and chocolate, only the best candy combination EVER.
 And those are just a few of the reasons.  Make up your own if you need more. 
 Halloween Candy Mini Cupcakes (print recipe)
1 cup all-purpose flour
1/2 tsp baking powder
1/4 tsp fine salt
1/2 cup natural peanut butter
6 T unsalted butter, room temperature
1/2 cup packed light-brown sugar
1 large egg, plus 1 large egg yolk
1/4 cup buttermilk
1/4 tsp vanilla extract
48 miniature Reese's peanut butter cups
48 pieces candy corn, for decorating

1.  Preheat oven to 350, with racks in upper and lower thirds.  Line two 24-cup mini muffin pans with paper liners.  In a medium bowl, whisk together flour, baking powder and salt.  In a large bowl, using an electric mixer, beat together peanut butter, butter and brown sugar on high until pale and fluffy, about 3 minutes.  Beat in egg and egg yolk, scraping down bowl as needed.  With mixer on low, beat in flour mixture, buttermilk and vanilla until combined.

2.  With the large end of a melon baller (or extra small cookie scoop), place 2 tsp batter into each muffin cup, then press a peanut butter candy into each center until batter aligns with the top edge of candy.  Bake until puffed and set, about 10 minutes, rotating pans halfway through.  Immediately place a piece of candy corn on top of each cupcake; let cool completely in pans on wire racks.  Makes 48 mini cupcakes.
Recipe from Everyday Food, October 2011

Saturday, October 22, 2011

Raspberry Tea Cake with Mascarpone Cream Filling

 
 It's crazy, I am still finding fresh raspberries on sale at the store, even in October!  And they're good ones.  So as long as I am finding them, we are eating them.

It was my friend's birthday a few weeks ago, and I know she loves creamy stuff, and fruit, so I thought this would be a nice birthday cake for her.  I love this size for when you just have a small gathering, or a family, and you don't need a huge cake with leftovers for weeks.  And you know what I always say, if it's not frosted you can eat it the next day for breakfast.  Which they did!
The raspberry tea cake would also be delicious on its own, as an actual tea cake.  It's just a fabulous sour cream loaf flavored with almond extract, or you could use vanilla, with raspberries folded in.  But if you happen to have a cake leveler and know how to use it, or a VERY steady hand with a bread knife (partially freeze the loaf for less chance of it falling apart), then go for it - slice it into four horizontal layers and slather on this dreamy creamy mascarponey filling!  Either way, you will boost your popularity.  And maybe even mine.

Raspberry Tea Cake with Mascarpone Cream Filling (print recipe)

Cake
2 cups King Arthur Unbleached All-Purpose Flour
2 teaspoons baking powder
1/2 teaspoon baking soda
1/2 teaspoon salt
1/2 cup butter, softened
1 cup granulated sugar
2 large eggs
1 teaspoon almond extract
3/4 cup sour cream
1 cup fresh raspberries


Cream Filling
1 1/2 cups whipping cream
2/3 cup granulated sugar
8 ounces mascarpone cheese
1/2 teaspoon vanilla
confectioners' sugar for garnish

1.  Preheat oven to 350°F. Grease a 9 x 5-inch loaf pan. In a large bowl, combine flour, baking powder, baking soda and salt; mix well and set aside. Using an electric mixer, cream the butter and sugar until light and fluffy. Beat in the eggs and the almond extract. Slowly add the dry ingredients, alternating with the sour cream. Beat until well moistened, then very carefully fold in the raspberries. Bake for 50 to 60 minutes or until a tester comes out clean. Let sit for 10 minutes on a rack to cool, then remove the pan and cool completely.

2.  The Cream Filling: Beat the whipping cream and 1/3 cup sugar until stiff peaks form. In a separate bowl, cream the mascarpone cheese and remaining 1/3 cup sugar, vanilla and Chambord until creamy. Add the cheese mixture to the whipped cream mixture.

3.  Trim the brown edges off the top and sides of the cake. With a serrated knife, slice the loaf lengthwise into 3 to 4 thin layers. Place one layer on a serving plate, top with some cheese filling, then another layer of cake and more filling, then repeat the next two layers, leaving a cake layer on top. Sift confectioners' sugar over the top layer. Cover and refrigerate. (*I placed the loaf pan back over it while in the fridge to help it from sliding or losing shape.

Recipe from King Arthur Flour


Wednesday, October 19, 2011

Apple-Cream Cheese Bundt Cake with Praline Frosting

  It's apple season.  You already knew that.  I had some darn good apple recipes last year, especially the Apple Cake with Buttery Caramel Sauce and those to-die-for Apple Pie Bars.  I thought I'd focus my efforts this year on making a great apple pie (two failures down, still working on it), but when I saw this cake on the cover of September's Southern Living, I knew I had to make it, and I paid full newsstand price.  Just so happened it was part of a whole feature on apple recipes, which I am still working my way through. (I tried the skillet apple pie - not great.)

But this sweetie was all the cover photo promised it would be.  Tall and spicy, sweet and nutty.  Brown-sugar-cream-cheesey.  Absolutely perfect for fall, and you know Bundts are the best portable/potluck cake going.  So if, say, your school holds an Election Day bake sale, like ours does, this would be just the thing.  I made it for our little family farewell party the night before Ed left on his annual elk hunting trip.  And - good planning - enjoyed most of the leftovers while he was gone!


Apple-Cream Cheese Bundt Cake with Praline Frosting (print recipe)
Cream Cheese Filling:

1 (8-oz.) package cream cheese, softened
1/4 cup butter, softened
1/2 cup granulated sugar
1 large egg
2 T all-purpose flour
1 tsp vanilla extract

Apple Cake Batter:
1 cup finely chopped pecans
3 cups all-purpose flour
1 cup granulated sugar
1 cup firmly packed light brown sugar
2 tsp ground cinnamon
1 tsp salt
1 tsp baking soda
1 tsp ground nutmeg
1/2 tsp ground allspice
3 large eggs, lightly beaten
3/4 cup canola oil
3/4 cup applesauce
3 cups peeled and finely chopped Gala apples (about 1 1/2 lbs.) - I used Cameo or whatever I had just picked at the orchard

Praline Frosting:
1/2 cup firmly packed light brown sugar
1/4 cup butter
3 T milk
1 tsp vanilla extract
1 cup powdered sugar

1.  Prepare filling:  Beat first 3 ingredients at medium speed with an electric mixer until blended and smooth.  Add egg, flour and vanilla; beat just until blended.

2.  Prepare batter:  Preheat oven to 350.  Bake pecans in a shallow pan 8 to 10 minutes or until toasted and fragrant, stirring halfway through.  Stir together 3 cups flour and next 7 ingredients in large bowl; stir in eggs and next 3 ingredients, stirring just until dry ingredients are moistened.  Stir in apples and pecans.

3.  Spoon two-thirds of apple mixture into a greased and floured 14-cup Bundt pan.  Spoon Cream Cheese Filling over apple mixture, leaving a 1-inch border around the edges of the pan.  Swirl filling through apple mixture using a paring knife.  Spoon remaining apple mixture over Cream Cheese Filling.

4.  Bake at 350 for 1 hour to 1 hour and 15 minutes or until a long wooden pick inserted in center comes out clean.  Cool cake in pan on a wire rack 15 minutes; remove from pan to wire rack, and cool completely (at least 2 hours.)

5.  Prepare frosting:  Bring 1/2 cup brown sugar, 1/4 cup butter and 3 T milk to a boil in a 2-qt. saucepan over medium heat, whisking constantly; boil 1 minute, whisking constantly. Remove from heat; stir in vanilla.  Gradually whisk in powdered sugar until smooth; stir gently 3 to 5 minutes or until mixture begins to cool and thickens slightly.  Pour immediately over cooled cake.

Recipe from Southern Living, Sept 2011

Sunday, October 16, 2011

Grapefruit-Buttermilk Sherbet

 This is one of those very rare occasions when we actually ate it before I could photograph it.  (It was that good.)  So instead you are getting a bunch of pirated pics off the internet that aptly represent it.  Let's be honest, did you really think my camera and skills had improved that much?  Sadly, no. 
 Lucky for us there are so many good pics of grapefruit sherbet out there!  It was tangy-sweet with that energizing bite only grapefruit can give.  Like yogurt but way better.  If we have to say goodbye to summer, at least we can enjoy fall's bounty, and with recipes like this, look forward to the sunshiney citrus of winter!
 Grapefruit-Buttermilk Sherbet (print recipe)
1 cup water
2 T finely chopped red grapefruit rind
1 cup sugar
1 cup fresh red grapefruit juice
2 cups whole buttermilk

1.  Bring 1 cup water to a boil in a small saucepan.  Add rind to pan; reduce heat, and simmer for 2 minutes.  Drain, reserving rind.  Combine rind, sugar and juice in pan; bring to a boil, stirring constantly until sugar dissolves.  Reduce heat, and simmer 20 minutes.  Remove from heat; pour into a bowl.  Chill for 1 hour. 

2.  Strain juice mixture (it will be like honey consistency), and discard solids.  Combine the juice mixture and buttermilk in the freezer bowl of an ice-cream maker; freeze according to manufacturer's instructions.  Then freeze in freezer for about 8 hours. Makes about 1 1/2 pints

For an optional garnish, boil julienne strips of grapefruit rind in simple syrup for 30 minutes; drain and toss in sugar.


Recipe adapted from Cooking Light, Jan/Feb 2011

Thursday, October 13, 2011

Nobody Better Lay a Finger on My Butterfinger Cookies

 When I was like 11 years old, Butterfinger was my FAVORITE candy bar.  So crispy-buttery!  So crumbly yet stick-in-your-teethy!  And I was more than a little proud when Butterfinger won the sponsorship of none other than Bart Simpson.  I knew Bart had good taste.
But I don't know when was the last time I bought and ate a Butterfinger.  I guess I probably had some at Halloween some time or another.  It's kinda got Halloween colors with that orangey center.
 This month I've been making a concerted effort to plow through my backlog of cooking magazines that have been piling up under my coffee table for a year.  Or two.  I tear out the recipes I want and file them in the appropriate folder in my recipe file box.  And dream that someday I'll make them all.
 But some skip to the front of the queue by nature of being either seasonal, intriguing, or downright irresistible.  This recipe was all three.  
 As you can see, they're a bit thin.  But they are very soft and homemade-tasting.  And chock-full of broken Butterfinger bars.  Tip: You don't even need to chop them because they fall apart easily.  I just put them in a Ziploc bag and very gently tapped them with a hammer.  That's all you need to do.  And voila, YUM in a cookie!
Butterfinger Cookies (print recipe)
1/2 cup butter, softened
3/4 cup sugar
2/3 cup packed brown sugar
2 egg whites
1 1/4 cups chunky peanut butter
1 1/2 tsp vanilla extract
1 cup all-purpose flour
1/2 tsp baking soda
1/4 tsp salt
8 ounces Butterfinger candy bars, chopped

1.  Preheat oven to 350 degrees.  Prepare baking sheets with silicone mats or parchment paper.

2.  In a mixing bowl, cream butter and sugars.  Add egg whites; beat well.  Blend in peanut butter and vanilla.  Combine flour, baking soda and salt; add to creamed mixture and mix well.  Stir in candy bars.  Shape into 1 1/2 inch balls and place on baking sheets.  Bake for 10 to 12 minutes or until golden brown.  Cool on wire racks.  Makes about 4 dozen.

Recipe from some Taste of Home magazine from a long time ago

Monday, October 10, 2011

Raspberry-Chocolate Chip Muffins

 
I am on a good muffin run these days.  Maybe just luck, but these muffins are goood.  That's right, three o's.  Not every post has a story, you know?  I just have made a lot of things lately that haven't made the VGP cut, so be it known my standards are as high (or higher) than ever.  And these made it.  They're good.  You'll like them.
 
Raspberry-Chocolate Chip Muffins (print recipe)
Crumb Topping:

1/2 cup unbleached all-purpose flour
1/4 cup sugar
1/4 tsp cinnamon
pinch of salt
3 T butter, melted
1/4 tsp vanilla extract

Muffins:
1/2 cup (1 stick) butter, melted
3/4 cup milk
2 large eggs
1 3/4 cups unbleached all-purpose flour
3/4 cup sugar
1 T baking powder
1/2 tsp salt
1 1/3 cups chocolate chips
24 to 36 fresh or frozen whole raspberries (about 2 small clamshells)

1.  Preheat your oven to 400.  Lightly grease (or line with cupcake papers) a 12-cup square or standard muffin pan.

2.  Prepare the crumb topping by mixing the ingredients together until very moist and crumbly.  Set aside.

3.  In a large bowl, whisk together the melted butter, milk, and eggs.  In a separate bowl, whisk together the flour*, thickener, sugar, baking powder, salt and chocolate chips.  Add the dry mixture to the liquid and stir until combined.

4.  Divide the batter evenly among the muffin cups.  Push three small or two large raspberries down into the top of the batter; they don't need to be covered by batter.  Sprinkle with the crumb topping, using a slightly heaped tablespoon for each muffin.

5.  Bake the muffins for 20 to 25 minutes, until they're golden brown and feel set when you touch them in the middle.  Remove them from the oven, and let them stand for 5 minutes before removing from the pan.
Recipe from King Arthur Flour

Friday, October 7, 2011

Lattice-Top Cherry Pie

I am a bit behind posting this one.  I made it this summer, after we went sour cherry picking.  Because believe me, and this is a lesson you only need learn once, sweet cherries like Bing and Ranier are no good in pies - they lose color, flavor and structure and all you end up with is a bland pie in a good crust you spent a lot of time on.

But if you want to make this delectably delicious cherry pie out of cherry season, like say for Thanksgiving, you still have options: jarred Morello cherries (I know Trader Joe's carries them, not sure where else) OR Oregon Fruit canned tart cherries.  Cook's Illustrated says both are great in this pie.

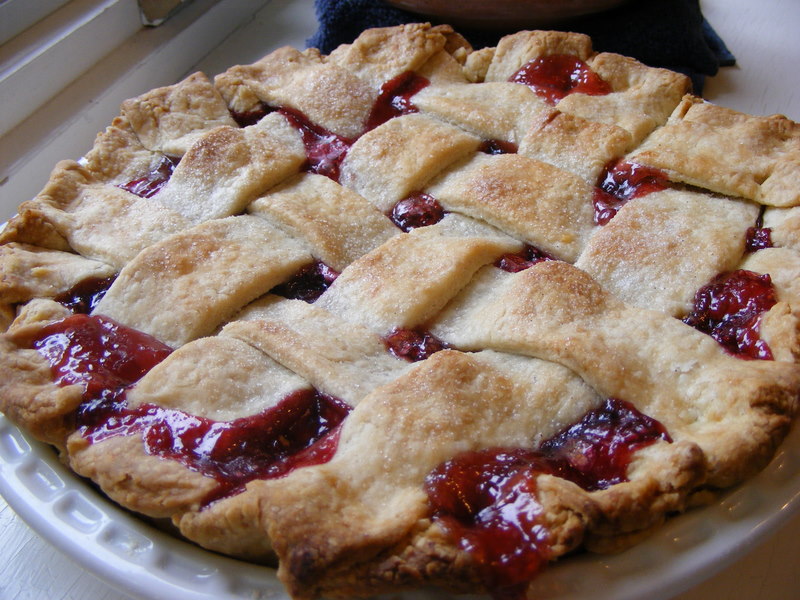
And.  How have we gone two paragraphs without discussing the lattice?  Eh?  You like?  That is one trusty, crusty, pretty top, and it's easier to make than you'd think.  (See instructions below.)

I can't tell you how happy and proud I am when I have a pie success.  They are still grossly outnumbered by disasters, but bit by bit there is improvement.  I didn't even like cherry pie before I made this, any cherry pie.  Because there are so many bad ones.  But this one is a bright, sweet-tart pastry delight.  Maybe I'll just go make another.
Pie Dough for Lattice-Top Pie (print recipe)
3 cups (15 oz.) unbleached all-purpose flour
1 tsp salt
2 T sugar
7 T vegetable shortening, chilled
10 T cold unsalted butter, cut into 1/4-inch pieces
10 T ice water

1.  Process the flour, salt and sugar in a food processor until combined.  Add the shortening and preocess untiil the mixture has the texture of coarse sand, about 10 seconds.  Scatter butter pieces over the flour mixture; cut the butter into the flour until the mixture is a pale yellow and resembles coarse crumbs, with butter bits no larger than small peas, about ten 1-second pulses.  Turn the mixture into a medium bowl. 

2.  Sprinkle 8-9 T ice water over the mixture.  With a rubber spatula, use a folding motion to mix.  Press down on the dough with the broad side of the spatula until the dough sticks together, adding up to 2 T more ice water if the dough will not come together.  Divide the dough into 2 pieces, one slightly larger than the other (if possible, weigh them; they should weigh 16 ounces and 14 ounces.)  Flatten the larger piece into a rough 5-inch square and the smaller piece into a 4-inch disk; wrap separately in plastic and chill 1 hour.

Lattice-Top Cherry Pie (print recipe)

1 recipe Pie Dough for Lattice-Top Pie
Flour for dusting work surface
1/4 cup (1 ounce) cornstarch
1 to 1 1/4 cups plus 1 T sugar
1/4 tsp ground cinnamon
Pinch salt
3 (24-ounce) jars Morello cherries, drained (about 6 cups), or fresh or canned sour cherries, pitted and drained
1/4 tsp almond extract

1.  Remove the dough from the refrigerator (if refrigerated longer than 1 hour, let stand at room temperature until malleable.)  Roll the larger piece of dough to a 15 by 11-inch rectangle, about 1/8 inch thick; transfer the dough rectangle to a baking sheet lined with parchment paper.  With a pizza wheel, fluted pastry wheel, or paring knife, trim the long sides of the rectangle to make them straight, then cut the rectangle lengthwise into 8 strips, 15 inches long by 1 1/4 inches wide.  Freeze the strips on the baking sheet until firm, about 30 minutes.   
2.  Roll the smaller piece of dough on a lightly floured work surface or between two large sheets of parchment paper or plastic wrap to a 12-inch circle.  Transfer the dough to a 9-inch pie plate by rolling the dough around a rolling pin and unrolling over the pan.  Working around the circumference of the pan, ease the dough into the pan corners by gently lifting the edge of the dough with one hand while pressing into the pan bottom with the other hand.  Leave the dough that overhangs the lip of the pie plate in place; refrigerate the dough-lined pie plate.
3.  Remove the dough strips from the freezer; if they are too stiff to be workable, let stand at room temperature until malleable and softened slightly but still very cold.  Following the illustrations below, form the lattice top and place in the freezer until firm, about 15 minutes.
To make the lattice, lay out 4 strips of dough on parchment paper.  Fold the first and third strips back, then place a long strip of dough slightly to the right of the center as shown.
Unfold the first and third strips over the perpendicular strip and fold the second and fourth strips back.  Add a second perpendicular strip.  Now unfold the second and fourth strips.
Repeat this process with 2 more perpendicular strips (you will have a total of 8 strips of dough, 4 running in each direction).  Freeze the finished lattice until very firm and then slide it over the filling.
(See step 6)  Trim off the excess lattice ends, fold the rim of the shell up over the lattice strips and crimp.
4.  Meanwhile, adjust an oven rack to the lowest position, place a rimmed baking sheet on it, and heat the oven to 500 degrees.

5.  Mix together the cornstarch, 1 to 1 1/4 cups sugar (taste fruit and adjust amount as desired), cinnamon, and salt in a medium bowl.  Stir in the cherries and almond extract.

6.  Turn the cherry mixture into the dough-lined pie plate.  Remove the lattice from the freezer and place on top of the filled pie.  Trim the lattice strips and crimp the pie edges.  Lightly brush or spray the lattice top with 1 T water and sprinkle with the remaining 1 T sugar (or vanilla sugar if you have it.)
7.  Lower the oven temperature to 425 degrees.  Place the pie on the baking sheet and bake until the crust is set and begins to brown, 25 to 30 minutes.  Rotate the pie and reduce the oven temperature to 375 degrees; continue baking until the crust is deep golden brown and the juices bubble, 25 to 30 minutes longer.  Cool the pie on a wire rack for at least 2 hours before serving.
 Recipe from Baking Illustrated: The Practical Kitchen Companion for the Home Baker

Tuesday, October 4, 2011

My Big Fat Bumpy Life Cake

  
I love this cake.  This cake goes back to before The Virtual Goody Plate.  Before New York.  Before I even had kids, and definitely before I did any serious baking.  I first made this in our little married student apartment in Boulder.  It came from a cake contest I saw on The Food Network, and it was around the time "My Big Fat Greek Wedding" was popular, when was that?  I just looked it up - 2002, that's about right.  The woman who won the contest came from a family that owns and runs a pecan farm in Georgia, so she wanted to show them off.  I was enthralled, and once I made it and tasted it, I was hooked.  It's still one of my favorites - it's both messy and pretty at the same time (like life), and the flavors are unique but amazing - chocolate cinnamon cake, and sweetened condensed milk icing.  Plus lots of pecan and marshmallow bumps.  

So yeah, life gets a little bumpy sometimes, but a cake like this can smooth things out for at least a few moments.
My Big Fat Bumpy Life Cake (print recipe)
Cake:

1 (14 oz.) can sweetened condensed milk, divided
2 1/2 cups all-purpose flour
1 tsp baking soda
1/2 tsp salt
1 tsp ground cinnamon
1 cup butter flavored shortening
1 cup sugar
1 cup firmly packed brown sugar
4 eggs
2 tsp vanilla extract
1 cup buttermilk
1/2 cup cocoa powder
1 cup hot water

Icing:
1/4 cup butter flavored shortening
Sweetened condensed milk (reserved from cake)
1 cup powdered sugar

Toppings:
1/2 cup miniature marshmallows
1 cup coarsely chopped pecans

Drizzle:
1/3 cup cocoa powder
3 T vegetable oil

1.  Preheat oven to 350.  Grease a 12-cup Bundt with nonstick cooking spray.  Measure out 1/3 cup of the sweetened condensed milk for using in the cake.  Reserve the rest for the icing.

2.  Combine the flour, baking soda, salt and cinnamon together in a medium bowl; set aside.

3.  In the bowl of an electric mixer combine the shortening, sugar, brown sugar, eggs, 1/3 cup sweetened condensed milk, and vanilla; beat at medium speed until creamy and fluffy.  Add buttermilk and cocoa and beat until blended.  Add flour mixture and beat on low to blend.  Then increase the speed to medium and beat for 5 minutes.  Stir in hot water with a spoon until just blended.  Pour batter into prepared Bundt pan and bake for 45 to 55 minutes, until a toothpick comes out clean.  Cool for 5 minutes in the pan; remove to a serving plate and cool to room temperature.

4.  Combine icing ingredients in the bowl of an electric mixer and beat at medium speed until smooth.  Stir the ingredients for the drizzle together until well combined and set aside.  Frost the cake with the icing and fill up the hole in the center if you wish.  Sprinkle the marshmallows and pecans evenly over the icing.  Decorate with the chocolate drizzle and serve.
 Recipe from Sandi Klingler, Food Network Cake Contest Winner 

Saturday, October 1, 2011

Banana Whoopie Pies

This is one of those posts where the pictures pretty much speak for themselves. I made these for a "light" dessert for a dinner party we attended - they are portable, there is kid appeal, but mostly they're just fun, really delicious, and not too big or heavy.

I made Martha's proscribed cream cheese filling and yeah, it was good, but I just felt it needed something to be real good whoopie pie filling. So I added some marshmallow creme - can that ever go wrong? (don't answer) - and in this case it was just the thing.

Sometimes I think I should start another blog just for banana recipes. They are all so good, I never get tired of them. And hey, these are even good in lunches! Wrap individually and store in the fridge for up to a week - send them in kids lunches and won't they be the envy of the table!
Banana Whoopie Pies (print recipe)
2 cups all-purpose flour
1/2 tsp baking powder
1/2 tsp baking soda
1/2 tsp salt
1/2 cup mashed banana (1 large or 1 1/2 small)
1/2 cup sour cream
1 stick unsalted butter, softened
1/2 cup granulated sugar
1/2 cup packed light brown sugar
1 large egg
1 tsp vanilla extract
16 oz. cream cheese, softened
1 cup confectioners' sugar, plus more for dusting
1/2 cup marshmallow creme1. Preheat oven to 350. Line 2 baking sheets with parchment. Sift flour, baking powder, baking soda, and salt into a bowl. Combine banana and sour cream in another bowl.

2. Beat butter and sugars with a mixer on medium-high speed, until pale and creamy, about 3 minutes. Add egg and 1/2 tsp vanilla, beating until incorporated. Add banana mixture in 2 additions, alternating with flour mixture.

3. Transfer batter to a pastry bat fitted with a 1/4 inch plain tip (or a gallon size Ziploc, then snip off a corner.) Pipe batter into 2-inch rounds on baking sheets, spacing about 1 1/2 inches apart.

4. Bake until edges are golden, about 12 minutes. Slide parchment, with cookies, onto wire racks. Let cool.

5. Beat cream cheese, confectioner's sugar and remaining 1/2 tsp vanilla with a mixer on medium speed until smooth, about 2 minutes. Stir in marshmallow creme until the filling is homogenous. Pipe or spoon 1 T cream cheese filling onto the flat sides of half the cookies. Sandwich with the remaining cookies. Dust with confectioners sugar and serve immediately. Makes about 2 1/2 to 3 dozenRecipe adapted from Martha Stewart
Related Posts Plugin for WordPress, Blogger...