Pages

Sunday, January 30, 2011

Marvelous Marble Cream Cheese-and-Chocolate Muffins

Hm. I think you're finding I'm on a chocolate kick. Seems to happen in the winter. I love these muffins because they are "muffins." Outrageously decadent "muffins" with enormous tops just asking to be broken off and eaten with fingers. Then devour the cheesecakey chocolate swirled base as if it's just another breakfast. Only you will know the truth.
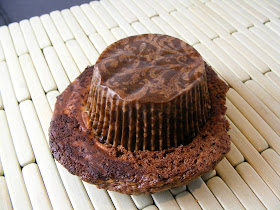
Marvelous Marble Cream Cheese-and-Chocolate "Muffins" (print recipe)
Cream Cheese Topping:

8 oz. cream cheese, softened
1 large egg
1/4 cup sugar
1/4 cup all-purpose flour
1/2 tsp pure vanilla extract
3/4 cup coarsely grated or finely minced semisweet chocolate

Muffin Batter:
1 1/2 cups sugar
3/4 cup vegetable oil
2 large eggs
1 tsp pure vanilla extract
2 cups all-purpose flour
2 1/2 tsp baking powder
1/2 tsp baking soda
1/2 tsp salt
Pinch ground cinnamon
3/4 cup cocoa powder
1 cup mild brewed coffee or cola (I didn't have either, and didn't want so much caffeine, so I used hot water)

1. Preheat to 350. Line a large 12-cup muffin pan with paper liners and place on a parchment paper-lined baking sheet. If you have extra batter, use another muffin pan, filling up empty muffin cups with water (mine made about 16.)

2. For cream cheese topping, put all topping ingredients except grated chocolate in a food processor and process until smooth.

3. For muffin batter, in a mixer bowl, blend sugar, oil, eggs, and vanilla. Fold in flour, baking powder, baking soda, salt, cinnamon, and cocoa. As you are blending, stir in coffee/cola/water. Blend until smooth (this is a loose batter.)

4. Pour batter into prepared muffin cups. Top each with portion of cream cheese topping and sprinkle on some grated chocolate. Using a knife, gently swirl topping into batter.

5. Bake until done and cream cheese topping seems set to the touch and edges of exposed muffins seem firm to the touch, about 18 to 25 minutes. Let cool 15 minutes before removing from pan.Recipe adapted from A Passion for Baking by Marcy Goldman

Thursday, January 27, 2011

BE the Bread Machine (a converting recipes tutorial)

OK, enough complaints and excuses. I love to try and post bread machine recipes because I love the idea of "bread at the touch of a button," but bread machines don't do anything magical that you can't do yourself. ANY bread machine recipe can easily be converted to a manual recipe, and here's how:

1. First, combine the ingredients the way you usually would for bread. Dissolve the yeast in the liquid, add other “wet” ingredients (e.g., eggs, honey, butter), add the flour and other dry ingredients, knead for 8 to 10 minutes, then knead in any “extras” (raisins, nuts, chocolate chips, etc.).

2. Let the bread rise once in the bowl until about doubled. The time will vary and you will have to experiment but it's usually around an hour, give or take. Or if you were going to do exactly what my machine does, rise for 20-3o min, punch down, rise again for 20-30 min.

3. Transfer it to a pan, cover loosely with plastic wrap and let it rise again in a warm place about an hour. A bread machine recipe calling for 3 cups of all-purpose or bread flour or 4 cups of a whole-grain/all-purpose flour mix, will make a 1-lb. (8 1/2” x 4 1/2”) loaf. A bread machine recipe calling for 2 cups of all-purpose or bread flour or 3 cups of a whole-grain/all-purpose flour mix, will make a 10- to 11-ounce loaf (a 7 3/8” x 3 5/8” pan).

4. Bake for about 30 minutes in a preheated 350°F oven.

If there is a recipe in which you only use the bread machine to make the dough, like in the previous post, conversion is even easier. Follow steps 1 and 2 above, then follow the recipe as indicated for whatever you do with the dough.

I got the above information from King Arthur Flour, who I trust when it comes to bread. It varies slightly from exactly what my bread machine does, but follows common bread-making, so I would try what they say first. If it doesn't work out, you could try following more closely what a machine does. In my bread machine user manual, it tells exactly what the machine does and for how long:

Dough-only Cycle (1.5 hours)
20 min - Dough is mixed and kneaded
20 min - Rise
30 sec - Dough is punched down
50 min - Rise

Basic Bread Cycle (3 hours)
10 min - Dough is mixed and kneaded
20 min - Rise
15 min - Knead
20 min - Rise
30 sec - Punch down
55 min - Rise
60 min - Bake

Want to get started right away? Here are all the bread machine recipes I've posted.

Wednesday, January 26, 2011

Chocolate Swirl Babka-Bread

Contrary to what this recipe's author claims, this is not exactly babka. Babka is more pastry than bread, and has an insane disproportion of chocolate to dough. This is more of a really awesome chocolate swirl bread that hints of babka, so I hyphenated the name for accuracy.

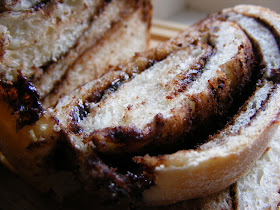
Did I mention this was done in the bread machine? Just the dough part, but still. Yay for ease! I got The Bread Lover's Bread Machine Cookbook from the library and somehow don't think I will get through all 300 recipes in the 3 weeks I have it out. But I can get a few made, and then I can renew it (so no one in Arlington request it!!!) If this bread is any indication of the rest, I will just buy it. You know I love my bread machine, and it's not even a good one.I had a plethora of great pictures so I will let them tell you the rest. Chocolate, bread, and a bit of ooey gooey. And it makes two loaves - one to eat hot, one to freeze for later (or give away, if you really love someone.) Or two to eat hot - your choice.
Chocolate Swirl Babka-Bread (print recipe)
Bread:

1 2/3 cups water
3 T unsalted butter, cut into pieces
4 cups bread flour
1/2 cup nonfat dry milk
2 T sugar
2 tsp salt
2 1/2 tsp SAF yeast (don't ask me) or 1 T bread machine yeast

Chocolate swirl:
2/3 cup sugar
2 1/2 T unsweetened Dutch-process cocoa powder
2 tsp cinnamon
Confectioners' sugar, for dusting, optional
Melted butter, for brushing

1. Place all the dough ingredients in the pan according to the order in the manufacturer's instructions. Program for the Dough cycle; press Start. The dough ball will be soft.

2. Grease two 8x4-inch loaf pans. Combine the ingredients for the filling in a small bowl.

3. When the machine beeps at the end of the cycle (1 1/2 hours for my machine), press Stop and unplug the machine. Turn the dough out onto a lightly floured work surface. Divide the dough in half. Pat each piece into a 10-by-14-inch rectangle. Brush each lightly with some melted butter. Sprinkle each with half of the filling, leaving a 1-inch space all the way around. Starting at a short edge, roll up jelly-roll fashion. Tuck the ends under and pinch bottom seams.

4. Place the loaves seam side down in the pans. Spray the tops lightly with cooking spray and cover lightly with plastic wrap. Let rise at room temperature until doubled in bulk, about 5 minutes.

5. Twenty minutes before baking, preheat oven to 350.

6. Bake the loaves for 30 to 40 minutes, or until golden brown and the sides have contracted slightly from the pan. Cool on a rack and dust with powdered sugar, if desired.Recipe from The Bread Lover's Bread Machine Cookbook by Beth Hensperger

Saturday, January 22, 2011

My First Fudge

Can you believe it? I'd just never made fudge before. Along with brioche, eclairs and crepe cake. Fudge is something I buy at specialty shops on vacation and get on goody plates at Christmas. I love it; it's like squares of thick frosting. I can eat a lot of it. Which may be why I've never made it.

Not true. The reason I've never made it, is because once when I was young (maybe 13?) I tried. I had some recipe that required the boiling product to reach "soft ball stage," which I had very carefully read up on, but try as I might I couldn't get a soft ball to form in my cup of water and the mass overcooked and it was all a waste. And I was scarred. Soft ball, my foot!

So until now I've just let others cook my fudge for me. But I had this jar of marshmallow creme in my cupboard (I had bought it for some recipe I never ended up making), and it had a recipe on the back, and I was having one of those crappy days when a couple hunks of solid frosting sounded OK, so I whipped this up. Thanks to my reliable candy thermometer, no soft balling was required.

I think there are a lot of ways to make fudge, but I think the final product is always good and all pretty much the same. As was this. It looks and tastes like fudge. Which is really good. And which makes a crappy day quite a bit sweeter.

My First Fudge

3 cups sugar
3/4 cup (1 1/2 sticks) butter or margarine
1 can (5 oz.) evaporated milk
12 oz. semisweet chocolate, chopped
1 jar (7 oz.) marshmallow creme
1 cup chopped walnuts or pecans
1 tsp vanilla

1. Line a 9-inch square pan with foil.

2. Bring sugar, butter and milk to a full rolling boil in a large saucepan on medium heat, stirring constantly. Boil 4 minutes or until 234 degrees on candy thermometer, stirring constantly. Remove from heat.

3. Add chocolate and marshmallow creme; stir until melted. Stir in nuts and vanilla.

4. Pour into pan. Cool and slice into squares. Makes 3 pounds.
Recipe from the Kraft Jet-Puffed Marshmallow Creme jar

Click here for printable recipe

Wednesday, January 19, 2011

Pistachio-Raspberry Tea Cakes

I recently got myself Martha Stewart's Cupcakes, and after poring over it in bed for several nights, decided this was the first recipe I wanted to try. And that is saying something because I love frosting, and these are one of the few unfrosted cakes. They just looked and sounded so good. I adore pistachios but have not baked with them much, so I was thrilled to see them sprinkled on top as well as a whole cup of them ground up in the batter.

Which, by the way, is nearly the simplest batter on earth to make. All the regular stuff you have around plus pistachios and raspberries. Both of which are delicious, and also happen to be festive if it's Christmas, but if not, make them anyway.I did fear for a moment, these being called "tea cakes", that they might have the old British crumb I talked about here. But, happily, Martha is very American so these are sweet, moist and surprisingly substantial, almost like a custard with a cakey crumb. Mmm, just superb. Bodes well for the rest of the book.Pistachio-Raspberry Tea Cakes
Nonstick cooking spray
1 cup unsalted shelled pistachios
1 1/2 cups sugar
1 tsp salt
1/2 cup unsalted butter, room temperature, cut into pieces
2 tsp pure vanilla extract
4 large eggs
1 cup all-purpose flour
1 to 2 containers (6 ounces each) fresh raspberries
1/4 cup slivered or chopped pistachios, for sprinkling

1. Preheat oven to 375. Line standard or mini muffin tins with paper liners; coat liners with cooking spray (I didn't do this, they came out fine.)

2. In a food processor, finely grind shelled pistachios with sugar and salt. Add butter, vanilla, and eggs; process until smooth. Add flour; pulse until just moistened and combined (do not overmix.)

3. Divide batter evenly among lined cups, filling each 3/4 full. Drop raspberries into batter (4 to 6 per standard tea cake; 2 per mini) and sprinkle with slivered pistachios. Bake, rotating tins halfway through, until golden brown, about 28 minutes for standard cupcakes, 14 for minis. Transfer tins to wire racks to cool. Serve warm or room temperature. Cakes can be stored up to 2 days at room temperature in airtight containers. Makes 14 standard or about 36 mini cupcakes
Recipe from Martha Stewart's Cupcakes

Click here for printable recipe

Sunday, January 16, 2011

Seriously Real Instant Hot Chocolate

It's too bad that somewhere along the way, "instant" has come to mean "powdered." Right? Soup, oatmeal and definitely hot chocolate. I'm not one to turn down Swiss Miss when that's all there is, but I really love a good hot chocolate. In order, my favorites are 1 - Jacques Torres Classic, 2 - Lake Champlain Aztec, 3 - Starbucks (non-fat, no whipped cream, nutmeg sprinkled on. OK, maybe whipped cream sometimes.)

And now I have a new favorite, I think maybe it can volley back and forth between the #1 and #2 spots. Diane Unger, who developed this recipe for Cook's Country, is in my opinion quite the clever little vixen. OF COURSE a big ball of chocolate ganache would make the perfect hot chocolate, just add milk! Why oh why is everyone out there trying to make their own hot chocolate mix with things like dry milk and non-dairy creamer when there is this? Even Ed, who sometimes can't handle the good stuff, loved it and asked for a second cup. Because it's real. Seriously real.

Seriously Real Instant Hot Chocolate
1 (12-ounce) bag (2 cups) semisweet chocolate chips OR 12 ounces high quality dark chocolate, uniformly chopped
1 cup heavy cream
1/4 tsp salt

1. Microwave chocolate, cream and salt in large bowl, stirring occasionally, until smooth, about 2 minutes. Refrigerate until firm, at least 2 hours.

2. Roll 3 tablespoons chilled chocolate mixture into ten 2-inch balls. Individually wrap balls in plastic wrap and transfer to zipper-lock bag. Refrigerate for 5 days or freeze for up to 2 months.
3. To make 1 cup of hot chocolate, combine 1 unwrapped chocolate ball and 1 cup whole or low-fat milk in large mug. Microwave, stirring occasionally, until smooth, about 2 minutes. Serve. You know it.Recipe from Cook's Country, Oct/Nov 2010

Click here for printable recipe

Thursday, January 13, 2011

Hershey's Perfectly Chocolate Chocolate Cake and Frosting

Editorial: Are you tired of my food photography yet? I am getting bored with it. Enough with the half-cake off-center close-ups, right? Unfortunately I don't have a great camera (an upgrade is about 11th on our big-purchase priority list, after new car, furniture for every room, new kitchen and laundry appliances, college funds, etc.), or any Photoshop skills, so I'm not sure what else I can do.

I did invest in a
Lowel Ego light awhile back so I can at least avoid using the flash (nice, see below), but sometimes it's still not great (not nice, see farther below.) I get ideas from cookbook pictures sometimes, but I gotta work with what I got - a black counter, a few decorative plates, a wooden coffee table, a white windowsill. I'm just saying, if you're annoyed, I want you to know I'm annoyed, too. Now happens to be one of those times.BUT. Let's please not let that distract us from yet another fabulous chocolate cake! This recipe from the back of the Hershey's cocoa box is my sister Maren's go-to chocolate cake for all occasions, and it's wonderful - a very reliable recipe for an outstandingly delicious, chocolately, rich homemade cake. NO cake mix taste, which, over the last few years, I have come to regard a bit of snobbish distaste.

This particular cake in the picture I was making for the birthday of a friend who is currently dairy-free. I chose the Hershey's cake because it calls for vegetable oil rather than butter. I substituted chocolate Silk for the milk, and used margarine in the frosting. Not my first choice, but better than no frosting at all! Especially when you usually have to pass up the treats...

Also. You may have noticed my subtle further use of ed-i-ble glit-ter on top. I simply love the stuff. I was going for sophisticated-festive. What do you think?Hershey's Perfectly Chocolate Chocolate Cake
2 cups sugar
1 3/4 cups all-purpose flour
3/4 cup Hershey's cocoa powder
1 1/2 tsp baking powder
1 1/2 tsp baking soda
1 tsp salt
2 eggs
1 cup milk
1/2 cup vegetable oil
2 tsp vanilla extract
1 cup boiling water

1. Preheat oven to 350. Grease and flour two 9-inch round cake pans. (Wet, wring and wrap on your bake-even strips if you have them. What? You haven't seen these on my Well-Stocked Kitchen List? They're number 8.)

2. Combine dry ingredients in large mixing bowl. Add eggs, milk, oil and vanilla; beat in medium speed 2 minutes. Stir in boiling water. Batter will be thin. Pour into pans.

3. Bake 30 to 35 minutes (20 to 25 for cupcakes) or until inserted toothpick comes out clean. Cool 10 minutes; remove from pans to wire racks. Cool completely before frosting.

Hershey's Perfectly Chocolate Chocolate Frosting
1/2 cup butter or margarine
2/3 cup Hershey's cocoa powder
3 cups powdered sugar
1/3 cup milk
1 tsp vanilla

1. Melt butter; stir in cocoa.

2. Alternately add powdered sugar and milk, beating on medium speed to spreading consistency. Add more milk if needed. Stir in vanilla. Makes about 2 cups frosting.

Recipe from the back of the Hershey's cocoa can

Click here for printable recipe

Monday, January 10, 2011

City Bakery Apple-Raspberry Upside-Down Cake

Are you picking up on a theme this month? I'm posting all the cakey things I made in December that didn't really fit in the goody plate groove. Plus we are getting into birthday season at my house so should just get used to lots of cakes and cupcakes in the next few months.

I felt like making this cake was a huge risk. I don't have a lot of upside-down cake experience and I really didn't know how it would turn out, much less taste. And I've never had City Bakery's original so I can't compare.

Luckily, and I do feel in some ways it was truly luck, it was magnificent. Really beautiful, moist vanilla butter cake topped with this warm halo of festive fruits. We served it at room temperature with whipped cream and it was divine. As a further measure of it's acceptability, we served it to company and all the kids liked it.
City Bakery Apple-Raspberry Upside-Down Cake
Fruit Topping:

1 1/2 cups diced peeled apples (I used a combination of Granny Smith and Golden Delicious)
1 cup fresh cranberries
1/2 cup fresh raspberries
1/2 cup sugar
1/4 cup cranberry or apple juice
2 T cornstarch

Cake:
1/2 cup unsalted butter, softened
1 cup plus 2 T sugar
2 large eggs
2 tsp vanilla extract
1/2 cup buttermilk
2 1/4 cups all-purpose flour
2 1/4 tsp baking powder
1/4 tsp baking soda
1/4 tsp salt

1. Preheat oven to 350. Generously spray a 7-inch cakepan or an 8-inch springform pan with nonstick cooking spray and line the bottom with a circle of parchment paper. Spray the paper with more nonstick spray. Place pan on a parchment paper-lined baking sheet (seriously, do - the topping may leak a bit.)

2. For fruit topping, toss all ingredients in a medium bowl and then spoon into prepared pan.

3. For cake, in a mixer bowl cream butter with sugar until well-blended and fluffy. Add eggs, vanilla, and buttermilk and blend well. Fold in dry ingredients and blend well. Spoon batter over fruit in cakepan.

4. Bake until firm and cake springs back slightly when gently pressed with fingertips, 50 to 65 minutes. Cool 15 minutes and then invert cake onto a serving plate. Carefully peel off parchment paper circle. Serve just warm or at room temperature.

Recipe from A Passion for Baking by Marcy Goldman

Click here for printable recipe

Friday, January 7, 2011

Poundcake Cupcakes with Lemon-Lime Glaze (an open-minded post)

I have this cupcake book I bought off the bargain shelf at Barnes and Noble. You know the one. Those $3.98 price tags just suck me in! Plus I know the girls love to look at all the pretty pictures. And if a few recipes turn out to be good, it was worth it.

Last week, during winter break, they wanted to make cupcakes, so I let them each choose a recipe from this book. Most of the recipes make small batches - 6 cupcakes - so it was perfect. Of course little girls choose recipes based solely on the pictures so I was surprised when Ginger chose this somewhat sophisticated treat over, say, the super pretty raspberry cream cupcakes or the ooey-gooey sundae-looking after-dinner mint cupcakes. But she's the boss so we made them.

And here's the thing. I didn't think they were that good. Not bad per se, but just kind of hard, dry, and not very sweet unless you got a good amount of glaze in your bite. They had what I call "British crumb." In the same family with British-style scones - not very sweet, not especially tender, maybe a bit crumbly. Definitely needs a glaze and a glass of milk or cuppa tea. This assessment is further supported by 1) the metric measurements in parentheses, 2) the use of terms such as "icing sugar" and "double cream", and 3) the publisher being based in Australia.

Actually, here's the thing. My mom liked them. I had written them off as not worthy of posting but my mom's praise gave me pause. I know she likes hard, crumbly treats, like scones and biscotti, more than I do but I also know she has good taste. It was like an epiphany. Not everyone has the same palate as me. Amazing.

So here I am posting something that, in full disclosure, is not my total favorite, but for what it is (British teatime treat), it is very good. And Ginger was so cute and proud, I think that made them even better.
Poundcake Cupcakes with Lemon-Lime Glaze
1 1/2 cups cake flour
1 tsp baking powder
1/4 tsp salt
3 eggs
2 T sour cream
1 tsp vanilla extract
3/4 cup unsalted butter, at room temperature
1/4 cup sugar
1 cup confectioners' sugar
1 1/2 tsp each freshly squeezed lemon and lime juice
1 tsp each grated lemon and lime zest

1. Preheat oven to 350.

2. In a small bowl, whisk together the cake flour, baking powder, and salt. In a separate bowl, beat the eggs together with the sour cream and vanilla. In a large mixing bowl, cream together the butter and sugar on medium speed until well blended. Beat in about a third of the egg mixture, then half of the dry ingredients; then another third of the eggs, then the remaining dry ingredients; and finally the remaining egg mixture until completely blended.

3. Divide the batter equally among 6 standard greased or lined muffin cups.

4. Bake until the tops spring back when lightly tapped, 20 to 25 minutes. Cool on a wire rack for 5 minutes.

5. Meanwhile, in a small bowl, stir together the confectioners' sugar and lemon and lime juices and zests (we saved out the zests and sprinkled them on top instead.) Turn out the cupcakes, place the wire rack over a sheet of waxed paper, and return them to the rack. Spoon citrus glaze generously over the warm cupcakes, allowing some to run down the sides. Serve warm or cooled.

Recipe from Perfect Cupcakes: Delicious, Easy and Fun to Make

Click here for printable recipe

Tuesday, January 4, 2011

White Chocolate and Vanilla Bread Pudding

This. This is what we had for Christmas breakfast at our house. Along with scrambled eggs, sausage, clementines and hot grog. But for me, this was the star. I have had my eye on this recipe for almost two years. No idea what I was waiting for. It just seemed like a special occasion dish, so I guess I was waiting for Christmas.

It was amazing. It took about 1 1/2 loaves of challah bread from my grocery store. Unlike in some bread pudding recipes that have you soak the bread overnight, this recipe only soaks for about 10 minutes, enough for the bread to saturate but there was still a lot of liquid left in my bowl. I was afraid it would be soggy in the middle if I used it all, so I spooned all the bread into my baking dish, then poured about half of the remaining liquid over. It cooked up perfectly - moist and custardy but not soggy or raw-ish, which is the worst. And you can't have the worst on Christmas!

This is obviously an indulgently sweet treat, with all that sugar, cream, vanilla and white chocolate, so what a balancing delight it was to have just a few tart raspberries tossed in, to keep your palate in check.
White Chocolate and Vanilla Bread Pudding
10 cups leftover challah, brioche, or egg bread, cut into chunks or cubes
1 1/2 cups light cream or half-and-half
1 cup milk
1/2 cup heavy whipping cream
7 large eggs, lightly beaten
1 cup sugar
1/2 cup unsalted butter, melted
2 tsp pure vanilla extract
1 tsp ground cinnamon
2 tsp baking powder
1/4 cup all-purpose flour
1/8 tsp salt
1 cup coarsely chopped white chocolate
1/2 cup currants or frozen raspberries

Finishing Touches:

Confectioners' sugar and ground cinnamon, for sprinkling
Whipped cream
Raspberries

1. Preheat oven to 350. Lightly grease a 9 x 13 pan or baking dish.

2. In a large mixing bowl, place bread chunks. In a separate bowl, mix together light cream, milk, heavy cream, eggs, sugar, melted butter, vanilla, cinnamon, baking powder, flour and salt. Pour over bread and let stand 10 minutes or so to absorb. Fold in white chocolate and raspberries.

3. Spoon into prepared pan (if there is liquid left in the bowl, pour about half of it over bread.) Bake until firm to the touch, about 40 to 50 minutes. Dust top with a little confectioners' sugar and cinnamon. Offer with whipped cream and raspberries on the side, if desired.

Recipe from A Passion for Baking by Marcy Goldman
Click here for printable recipe

Saturday, January 1, 2011

Gearing Up for 2011

Hi. Happy New Year. What are you doing today? We're hanging out, cleaning up, watching TV, eating chili. And later tonight I am going to a girls' night "Eclipse" DVD party. And bringing something chocolate (either these or these.)

Something I keep meaning to do here on the VGP is talk about my gadgets and gear. Sometimes I mention them, but I want to really do them justice, really hail their virtues. But I never get around to it; I'm too busy using them and writing about what I've made.

So I took a few moments to reflect the other night, and put all the things I use and love the most in an Amazon.com Listmania! I thought sharing them might be a nice way to start off the new VGP year. So here you go: